|
TennisOne Lessons
Movement and the Alexander Techniqueby Gary Adelman
The initial article of this series observed how many of the great shots of the game incorporate principles of the Alexander Technique and that all players can use those principles to improve their games. The Technique, used for decades by actors and musicians to enhance their performances, focuses on the efficient and natural use of the body. It enables the student to achieve a more harmonious relationship of the head, neck and torso. More specifically, the Alexander Technique teaches free head balance, the lengthening of the spine and expansion of the entire torso. These characteristics can be seen in the Sampras serve, the Agassi groundstrokes and the over-all fluid play of Roger Federer. Indeed, if even the best players violate these principles, the result is usually a comparatively weaker stroke (a future article will demonstrate this by comparing the Sampras serve and backhand). At the core of the Technique is the idea of non-doing, i.e., not interfering with the natural design of the body. Both on the tennis court and in life's other activities we habitually do things to our bodies which cause that interference. The Technique allows us to discover these habitual tendencies and to stop them. If you stop them, then, in the words of F.M. Alexander himself, "[T]he right thing does itself." In other words, our innate coordination will reappear. If you will, we need to "unlearn" what we are doing wrong to allow the natural processes to appear.
This and the other remaining articles in the series will demonstrate specifically how to apply the principles of the Technique to improve the different areas of your game. They will not only cover the principles of the Technique as they relate to the various parts of the game but also the common habits many players (even some good ones) fall into which result in inefficient use of their bodies. This article will focus on how the principles can be used to improve your movement and the interrelated concept of balance. Specifically, it will bring the fresh perspective of the Technique to three aspects of movement:
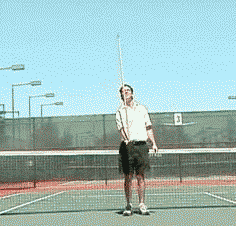
As proper movement is such a huge part of the game, using the Technique in these areas has the potential to significantly improve your tennis (regardless of your current level of play). Balance and the Ready PositionThere are two types of balance, "stable" and "unstable." Something which is in stable balance is both in balance and difficult to move or be put off balance. An example would be a table whose four legs and weight give it great balance and make it difficult to move or tip off balance. Stable balance is great for things like furniture but not very helpful when moving around a tennis court. Unstable balance means being in balance but in a state that is unstable, i.e., susceptible to quickly going from on-balance to off-balance. "Unstable," in this context, does not mean you are off balance but, rather, your balanced position can quickly turn into an unbalanced one when you need it to. Unstable balance is perhaps best demonstrated by holding a pole upright in the palm of your hand The pole is in balance (not tipping) but with just a small movement of your hand you can make the pole fall (lose its balance). The pole is in a kind of state of "weightless" balance that can be converted almost instantaneously to an off-balance position. This unstable balance or equilibrium is sometimes called "poise" (the pole is in balance but is poised to move).
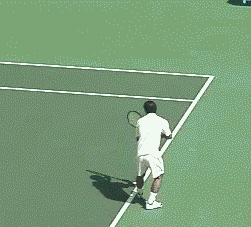
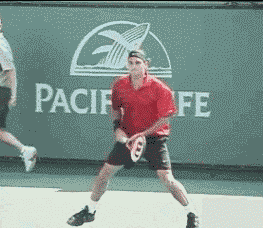
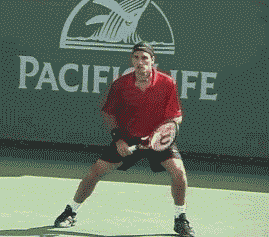
A good tennis ready position is much like the pole in its position of unstable balance. Almost all movement in tennis starts from the ready position. Like the upright pole, you want to feel as light or weightless as possible. Like the upright pole, the weightless ready position has a built-in potential for movement. How can we best achieve this weightless ready position? There are two keys. The first key is to achieve the proper "counterbalance" between the head and knees, on the one hand, and the hips, on the other. The head and knees should be slightly forward (closer to the net). The hips (pelvis) should be slightly pushed back (towards the back fence) which counterbalances the forward position of the head and knees. There are three common mistakes which prevent players from achieving the proper counterbalance. First, some players let the head go too far forward in space. They can not see all of their opponent's court from this position. The second common mistake is to place the hips too far back. This has the undesirable result of placing the weight back on the heels. A third mistake is to tighten at the hip and ankle joints. This tightening braces the knees, prevents the knees from properly moving forward so they can counterbalance the weight of the hips.
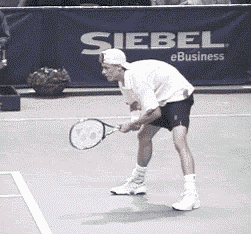
You might ask, if the recommended head position is only slightly forward, why do some top players such as Lleyton Hewitt, when awaiting the serve, bend forward in an exaggerated fashion with their upper bodies almost parallel to the court? The explanation is simple. They do not stay in that position. As the server goes into his motion, the returner will start rising up. By the time the server makes contact the returner is pretty much in the recommended ready position. Then why do the players bend over at the start? The bending results in a certain stretching of the muscles which creates potential elastic energy. As the player comes up from the bent over position the muscles fire like a rubber band travels after it is first bent back. But first master the basic ready position before experimenting with the bent over start on the return. The second key to achieving the poised ready position is to bend (crouch) from the hip joint and not the waist. Bending from the hip joint retains the integration and proper lengthening of the spine. The spine remains one unit and is free and mobile, enabling you to react and move quickly. The full integration and lengthening of the spine gives your body a feeling of lightness. In contrast, bending from the waist breaks the natural integration of the spine as one unit and results in a downward compression. The downward compression causes a feeling of heaviness and a resulting loss of mobility.
A major reason players bend from the waist and not the hip joint is they have a misconception as to where the hip joint is located. In particular, they think their hip joints are located higher up than they really are. There is an easy way to locate your hip joints. If you wear a pair of pants and sit down in a chair, there is a crease that runs across the pants. The point where that crease crosses your hips is where the hip joint is located. Split-SteppingWhen in the ready position and your opponent starts to swing forward, you should split-step. The split-step stimulates the muscles, putting them on a stretch ready to explode (again the rubber band analogy comes in handy).
Moving to the Ball
Specifically, the rest of the body will begin to lengthen in the direction of the head. In other words, the head moves and initiates the movement and the rest of the body follows the lead of the head. We do not have to contract muscles to initiate movement. Rather, we release muscles to move. We do not need to "do" anything to move; rather, we need to "undo." So far relatively simple, right? But we now come to something counter-intuitive. The previous paragraph refers to the head "falling" and the body following. But by falling we do not mean lowering. Rather, falling in this context means going from balance to (momentary) non-balance as the head moves forward. The actual movement of the head is forwards and up (the upwards movement is at approximately a 45 degree angle), not forward and down. Think of it as "falling upwards." How can this be, especially when we talk of letting gravity (which is a downward force) do the work? Without going into complicated body mechanics, the forward movement (tilting) of the head triggers a kind of stretching chain reaction in other parts of the body resulting in a lengthening (upwards movement) of the whole body including the head.
The whole notion of the head leading and the body following goes against our beliefs. Many players have the misconception that their legs are responsible for leading their movements and they spent a lot of time strengthening their leg muscles. Of course, the legs do participate in movement but they should not initiate movement. The legs follow the lead of the head and torso and are used to recover our balance. In other words, moving is a continual process of first leading with your head which puts you off balance followed by a recovery phase in which our legs help us regain balance followed by the head again leading and putting us off balance, etc.. In all of this, the head remains quiet as it goes from a poised state to falling just slightly forwards with the spine then lengthening in response. The easiest way to grasp the notion of the head leading and body following is to watch or visualize any 4-legged animal such as a cat or a dog. These animals are oriented horizontally so it is easier for us to see how the head leads the movement. If a cat is stalking a mouse, it quietly watches the mouse and then suddenly pounces by moving its head first and then its whole spine lengthens out and follows the lead of its head in order to recovers its balance. Its legs do not lead--its head does. Good movers allow their heads to lead them into movement (with the falling upwards movement discussed above). Poor movers seldom do. Instead, they move their heads back and down as they run which stops the flow of movement throughout their body.
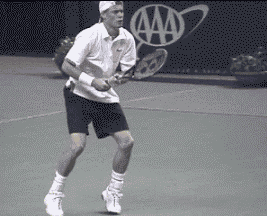
Good movers allow their whole spine to follow their head moving. Poor movers stiffen their spine and hollow their back as they throw their heads back. Good movers use their entire body to move. Poor movers put all their attention on their legs as they move and push down into their legs. They grip with their leg muscles and overwork their legs. If the head leads and the body follows by lengthening upwards then all the pressure is taken off the joints and spinal discs. The whole body becomes more toned and freer to move. The body will then begin to lighten because any heavy downward pressure is released. The player will feel lighter and also be quicker. Quickness is increased because any excess muscular contraction is counterproductive. Extra tension stops movement from occurring and slows us down. By learning to take the brakes off and allowing the natural organization to occur with the head leading and body following, movement will be optimal. We can see these principles of movement at work in the fluid court movement of Roger Federer. Gary has taught the Alexander Technique at Harvard University and Babson College and as assistant varsity women's tennis coach at Princeton University. Gary can be reached by email at GaryAdelman@verizon.net and by phone at (413) 442-5905. |