|
TennisOne Lessons
|

|
|
In the following piece I am going to speak in "Face." In other words, the language of the racquet face. I believe the more you understand about the face of the racquet, the easier it is to play the game. I could have chosen to write this piece in the language of "Grips" but I have found that people tend to get wrapped up in debating where the knuckle is on a Continental grip versus a Semi-Western grip, rather than knowing what benefits you can reap from playing with one grip or another.
In each of the photos, simply by looking at the angle of the racquet face we can make a highly accurate guess as to strengths and weakness of the player holding that racquet. From five courts away I can be heard yelling at a player "How could you have
 |
Based on the assumptions we can draw from the angle of a racquet face we can organize a solid game plan even
Certainly this is not fool proof and in accordance with Darwinian theory, we as a species must learn to adapt in order to survive. This is why each year I come across a couple of unique strokes someone has invented due a physical limitation or simply from years of repetition (by the way these people tend to be covered with braces and arm bands).
Some of the biggest changes in today's games aren't really changes but rather admissions of facts that have existed for over a hundred years. If you ask any pro player what grip they use on their forehand, the truthful answer is one I heard Billie Jean King tell me as a kid over thirty years ago. " I don't have a forehand grip I have forehand grips".
|
|
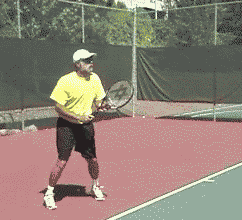
Every Picture Tells a Story
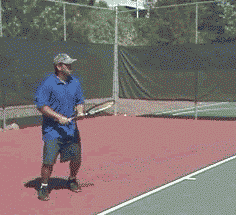
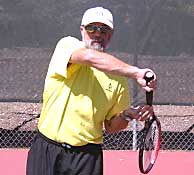
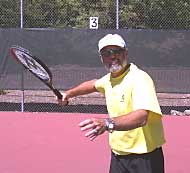
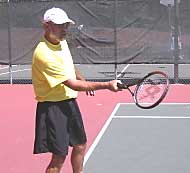
Grip #1
Advantages: This grip will allow physically weak players to develop a powerful shot. This is due to the whippy nature of the stoke you often see top ranked players under 12 using it. The grip is great for generating topspin a prime reason why top Europeans and South Americans who play a lot on clay can bee seen with it. It's a great tool for consistency for those who like to keep the ball in play. High ball present no problem.
Disadvantages:
   |
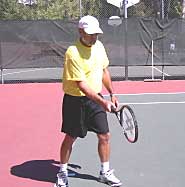
-
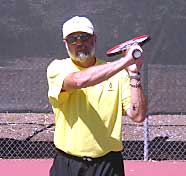
During the backswing (left), the butt of the racquet is draw back way before the head. The hitting surface of the face is actually pointed away from the body.
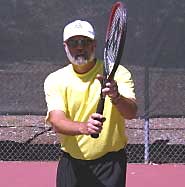
-
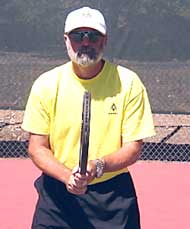
The center photo displays a comfortable height in the hitting zone for this style forehand.
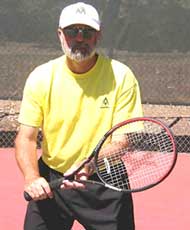
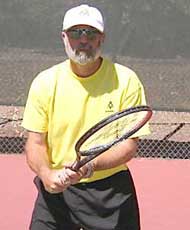
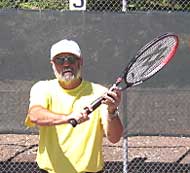
Grip # 2
 |
Disadvantages: Difficult to convert high, deep, and especially soft balls. (Moon ball style). The racquet face naturally is closed making it very tough to hit up on the ball.
   |
|
|
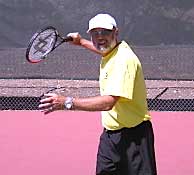
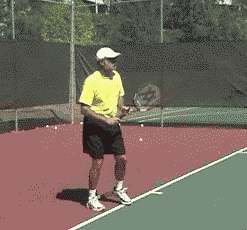
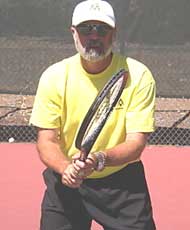
Grip # 3
 |
Advantages: This is going to be a short tale. The greatest thing about this grip is there are no major weaknesses.
Although waist level is probably the prime hitting zone, high balls and low balls present no major problems. This stoke is just good old fashioned solid.
Disadvantages: This too is going to be a short story. The major disadvantage is that usually nothing spectacular will come off the strings toward your opponent.
However, how many times have you lost a match because of inconsistency rather then the inability to hit winners. This grip will help you minimize miss hits and increase consistency.
   |
|
|
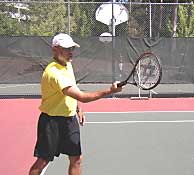
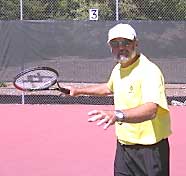
Grip #4
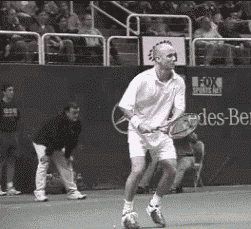 |
Advantages: The great thing about using this grip is it will allow you to generate tremendous topspin when in the rally mode yet when it comes time to step up to the ball and flatten out your shot for a winner, there isn't a grip which will let you put more pace on the ball.
Take a look at some of today's players who like to hit that inside out forehand.
Disadvantages: Like the first grip we looked at, low balls will tend to create problems but with this grip it's much less of an issue. Slicing the ball is fairly limited and volleying will require some additional grip changes.
   |
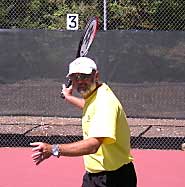
- During the backswing (left), the butt of the racquet is drawn back way before the head and the hitting surface of the face remains closed then pauses at this moment for a sudden change of direction to smack the incoming ball.
Well how did you do? Were you able to recognize yourself or any of your recent foes? Grip #1 was the Western, Grip #2 Continental, Grip #3 Eastern, and Grip #4 semi Western.
The next time you're listening to some local "expert" at your club or one of the tennis gurus during a television broadcast referring to a Western Grip, imagine Grip #1 and see if the game plan being executed fits the patterns I've set forth.
Now that you're nearly fluent in the language of grips, you can use this knowledge to your advantage. Next time you play a match, check out the way your opponent holds the racquet. You should be able to formulate a solid game even before the first point is played.
![]()
 Corky Cramer, TennisONE contributing editor, is beginning a new series of articles from America's Great Teaching Pros. He is the Director of Tennis at the Montecito Heights Health and Racquet Club in Santa Rosa, California.
As one of the top coaches in Canadian history, he developed over 50 players who won national titles, and coached over a dozen Davis Cup and Fed Cup players. A 25 year USPTA member, Corky is also a board member for The Advanced Tennis Research Project ( www.AdvancedTennis.com ).