|
TennisOne Lessons
Stable Alignment Daryl Fisher Do you regularly suffer from tennis related injuries? Do you have trouble maintaining consistency when generating power? Do you have trouble handling powerful shots? If the answer is yes to any of these questions, then you will likely benefit from learning about what I am going to call “stable alignment.”
Achieving stable alignment involves the relative positioning of parts of your body as you hit the ball that creates the greatest stability and resilience, which in turn protects the body's weaknesses. Perhaps more concretely, returning a tennis ball moving at 90 mph is a nearly impossible task for most tennis players, but it is far less challenging for players that can meet that ball with stable alignment. Penalties for a Non-Stable AlignmentPoor alignment often leads to injuries and the need for elbow and wrist braces. Injuries are obviously not desirable, but even if injuries can be avoided, a stroke using poor alignment would still be problematic because it would lead to undesirable muscular tension (perhaps just to keep the racquet from being knocked out of your hand). For example, if you do not have stable alignment on the forehand side, you might be able to stiffly muscle through the stroke with little likelihood of injury, but with certainty this is not maximizing your stroke’s potential. Muscling through a stroke and thereby creating tension is a subtle problem compared to an injury, but if you want to play better tennis, it is worth understanding that tension has its drawbacks. At the very least, control will certainly suffer from muscling through. Tension detracts from your ability to make fine muscular adjustments that are required for good “feel” and “touch.” Tension also makes quick movements more difficult, and this generally detracts from your ability to hit with power. For more information on this topic, I offer the following articles on relaxed hands. Stable Parts Stable alignment involves the whole body at some level, from digging in with the legs against the ground to how the wrist should be positioned. To have stable alignment for the whole tennis motion, the parts of the motion must be stable.
To help understand this concept, consider the “part” closest to the racquet, the wrist joint. To be considered stable the wrist can be “laid back” by bending the back of the hand toward the forearm. This stable position can handle a great deal of force and have a low risk of injury. You could put your wrist in this position and push against a heavy object. As a matter of fact, if you do push against a heavy object you are fairly likely to automatically put your wrist in this position. Alternatively, if the wrist is bent in the other direction—that is, if the palm of the hand is bent toward the forearm—then the wrist is in an unstable position. This position can handle only a small amount of resistance before it becomes at risk for injury. This alignment could be said to be the opposite of stable alignment, which could be called weak or poor alignment. The wrist can move in directions other than just the two mentioned so far, of course, and these other positions can be factors with regard to the stability or weakness of the alignment. To move the wrist so that the thumb moves closer to the forearm keeps the alignment stable and strong, but to move the wrist in the opposite direction and allow the heel of the hand to drop toward the forearm is weaker. If we consider the combinations of the four directions mentioned so far—back of hand toward forearm, palm toward forearm, thumb toward forearm, and heel of hand toward forearm—you will find that you generally want to avoid putting your wrist in any of the weak directions and that any combination of the strong directions is acceptable. Different Requirements for Each Stroke Every stroke has different requirements for creating stable alignment. There are even different requirements for hitting different spins. For example, the continental grip makes stability easier to achieve when hitting with underspin, and a range of other grips make stability easier when hitting topspin. It goes beyond the scope of this article to consider every grip in relation to its stability, but when considering any stroke, it might be useful to imagine the body alignment from which you could push or pull a large amount of weight. The joint that is most likely to collapse under the strain is the most likely failure point. Every stroke also has common failure points. For example, for the one-handed backhand volley, the most common failure point is the wrist.
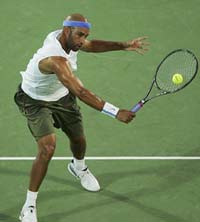
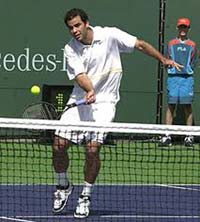
Volley Stability A beginning tennis player commonly finds stability slower to achieve on the backhand volley than the forehand volley. The reason behind this may be as simple as the fact that the forehand wrist alignment is more naturally stable compared with the backhand wrist alignment. The backhand volley might also be complicated by the fact that many people imagine that the back of the hand should face toward an oncoming ball. If the wrist were knocked back in this position by a hard hit ball, however, it would be knocked back into the weak alignment and put the wrist at high risk for injury. To avoid this risk the back of the hand should be directed at least somewhat toward the sky, with the heel of the hand (the pinky finger end of the hand) leading the motion. The Volley "Learning Curve" Though the forehand volley starts out as the easier side because the wrist is in a more intuitive side for finding stable alignment, once stable alignment is found for the wrist on both the forehand and backhand, many people find they prefer to volley with their backhands. This might seem surprising at first if you think that both sides would be equal once stable alignment is found for the wrist for both volleys. This is not the case, however, because each side has different requirements as we move up the arm. The elbow and shoulder are not crucial joints for stable alignment on the backhand side, just the wrist is. On the forehand volley, however, the shoulder becomes the next point where stable alignment is crucial. Important Note: On both sides the elbow does not matter much if the wrist is sufficiently stable. For those of you with tennis elbow, if you suspect that your condition is the result of leading with your elbow with your one-handed backhand volley, you will likely need to change your grip so as to change your wrist alignment in order to relieve your problem. Shoulder Alignment Differences
For the one-handed backhand volley, the shoulder can move in many directions and still be stably aligned. For example, if you were to extend your arm directly in front of you so that your arm forms a 90° angle with your chest, you will notice that this angle is extremely common for pros when meeting the ball. Alternatively, if you were to extend your arm to the side so that the arm and chest angle is a straight line (180°), you would notice that this is also perfectly acceptable shoulder alignment for the backhand volley. In fact, it is extremely common to create this alignment when extending for a stretch backhand volley. For the forehand volley you will find that the shoulder angle has more importance than on the backhand side. The shoulder at 90° (or very close to 90°) is stable, but at 180° (or very close to 180°) is far less stable. Imagine how you would align your arm to push something heavy, like a piano on wheels. This is the alignment that you want for hitting your forehand volley. Alternatively, to push with your arm to the side of you would probably hurt your shoulder, and similarly, you do not want that alignment for your forehand volley. Tests If you have read any of my previous articles, you know that I am an advocate of relaxing the arm through a stroke to test whether the stroke is a good one. If the arm can remain relaxed through a stroke, even when the ball is coming quickly, then the stroke is likely stable. I also recommend the exercise of attaching a stretchy resistance band (light resistance should be enough) to the tip of a tennis racquet and tying the other end in such a way as to be able to create resistance as you make your motions. This might require you to tie the non-racquet end in different places so as to be able to test your motions appropriately. For example, you would want to tie the band lower for a motion with which you swing up. This exercise might give you a light workout in addition to helping you identify any weak links. Be careful with this test, however. Remember that one of the dangers of weak links is injuries! Alignment and Technique Stable alignment is fundamental to good tennis technique, but it is complicated and difficult to describe, and for these reasons it is often poorly understood. Stable alignment and good technique are so interrelated, in fact, that it has been my experience that understanding what stable alignment means speeds the process for achieving good technique. This article is far from complete with regard to describing each of the strokes and the associated requirements for stable alignment. In answer to that incompleteness I have both the hope of writing additional articles on the topic and the hope that the information above is at least enough to get you started thinking about how you can better avoid injuries while handling and generating power with greater efficiency. |