|
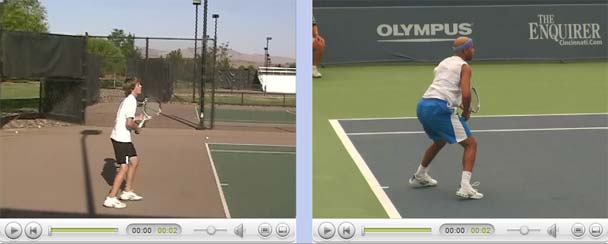
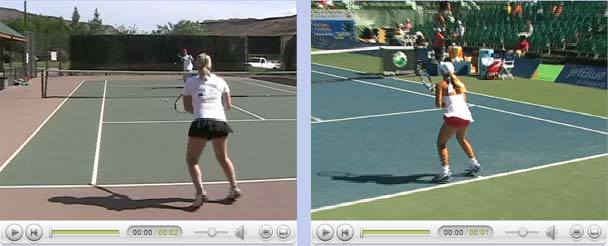
TennisOne Lessons TennisOne Video Network: Stroke Comparison Tool David W. Smith, Senior Editor TennisOne Growing up and playing tennis in the early 1970’s the advent of video tape was in its infancy. Few, I believe, were able to envision how the medium would change the way tennis—or any sport for that matter—was observed and studied, or what impact the ability to record and play back moving images would have in our lives. I remember, during a special physical education assembly, our high school wheeled out a brand new video camera and playback system, (all attached to a thick umbilical cord from camera to recording reels), demonstrating the first time that most any of us, kids or adults, had been able to witness the viewing of an action having just taken place a few moments before. The playback was black and white, (color would come later, of course!), but there we were, clowning around for the camera, just waiting to say, “There I am” when the teachers played back the recording. Yet, it would be at least a decade before any of us would be able to use that technology for the study of tennis for ourselves. Advances, of course, were made and eventually almost everyone today has a video camera. However, just having a video camera to film ourselves or someone else, was still limited in its use. Sure, we can see ourselves hitting a tennis ball and, perhaps, identify elements that we know are not exactly right in our swing or footwork. However, this ability to recognize improper or maligned hitting elements is not only difficult for many players, understanding any corrective movements or patterns are usually even harder for players. For years, many of us recognized this limitation; I can remember saying things like, “Wouldn’t it be great to have a split screen with us hitting on one half and a pro hitting the exact same shot from the same angle?” Knowing that with such technology, we could quickly identify footwork patterns, grips, stroke or swing patterns, finish and recovery movements, etc, that did not follow that of the pros. Obviously, having more than just a couple pros to choose from, (given individual nuances and characteristics), would be even better. Well, my dreams have become a reality! Now, with the incredible TennisOne Video Network, you have the ability to compare and contrast your strokes to those of the pros. TennisOne Video Network As a teaching pro, I am very excited by this new technology. What is even better is that the use of this feature is free to all our TennisOne members! As many of you might know, there is software you can buy that does this same thing, (at a cost of a thousand dollars or more!), but has limited use because for any real value, you need professional clips for comparison (which can be an added cost with only a limited number available). With our huge TennisOne library of top pros hitting thousands of shots from every conceivable angle, you now have the tools at your own fingertips that we could only dream of just a few decades ago. Using TVN To use the TennisOne Video Network, all you need to do is upload a short video clip of your own (preferably a fairly clear, short segment). Once your clip is saved on “My Videos,” you can click on the “Stroke Comparison Channel” where you can pick your saved video clip. Your image will appear and a list of pros available will come up next to your clip. Click on the pro, the stroke, and the view, (front, right side, left side, rear, and level). In just a few moments, your image with the selected pro’s image will appear side by side in two large viewing frames with controls to start and stop the two images as desired. Examples of Using TVN Stroke Comparison Channel Below are two examples of how you can use the Stroke Comparison Channel to help identify stroke patterns as well as compare them to those of the pros. In the first example, I am using Brock Aldred, a 15 year old sophomore in our program. We wanted to look at his forehand compared to that of two of his favorite players, James Blake and Andy Roddick as well as one additional comparison, Novak Djokovic.
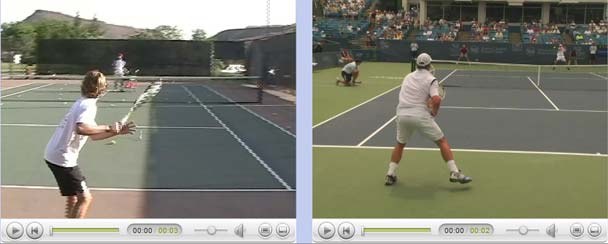
While the two shots above are not exactly the same, (with Blake hitting a reverse pivot topspin forehand and following the shot to the net; Brock hitting a controlled stroke in a practice rally), we can identify points that are similar. Both players are hitting fairly open stance forehands. We can see both players loading up their inside right foot, putting weight on this foot while dropping their racquets back in fairly similar loop strokes. Up to contact, the two forehands look similar. It is after contact that we see some differences between Brock’s forehand and James Blake’s. After contact, Brock extends his hitting arm out towards the target, forcing him to roll the racquet a bit more than Blake—who instead wipes up faster in a more compact stroke. We also can see the more angular movements of Blake opening the upper body more dramatically as well as falling back on his outside foot, (in what is called a ‘reverse pivot’).
This time, using a rear view, we compare Brock’s forehand with that of Andy Roddick. Beyond the obvious explosive power Andy displays, we can see some similarities we'd expect to see in any good player’s stroke. The first thing I like to see in players is the use of the off hand and arm in creating the “unit turn.” We see that in both Brock’s as well as Roddick’s preparation. Brock sets up with a conventional closed stance, but keeps his leg back during contact. This is an important point because too many players swing this back leg around at contact forcing them to push the ball instead of creating good angular momentum by letting the racquet accelerate past the hips. With any open stance, the player will want to make use of the inside foot, (closest to the ball), and load this foot and leg with significant force. The thrust of this leg pushing off will lift a player off the ground, not necessarily as an intentional “jump” but a result of the thrust up off this leg. Notice how Roddick maintains the left foot’s position, not allowing his body to whip around. Instead, we want to see the racquet accelerate around the body maximizing the angular momentum established by the unit turn, and in Andy’s case, the open stance of his feet. I bring this up because a player will want to learn both an open as well as a closed stance forehand. Players will hit a closed stance in almost every instance on the run towards their forehand side. Brock’s forehand provides a solid foundation to hit a fluid forehand topspin.
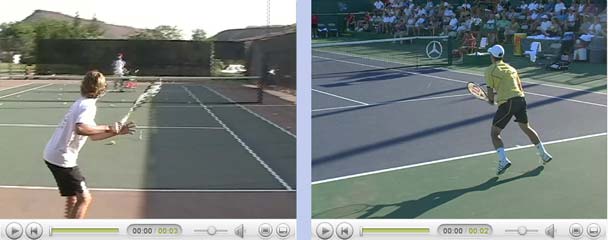
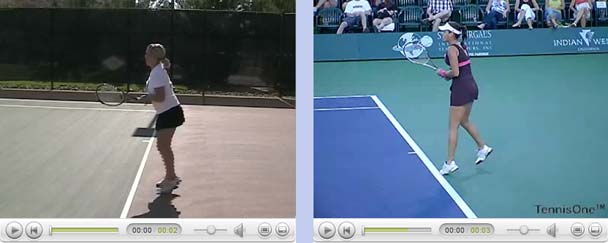
One of the great things about the Stroke Comparison Channel is that you can compare yourself (or your student) to many pros. Above, we have Brock side by side with Novak Djokovic. In the Djokovic clip, we can indeed see the pro running to his right to access a wide forehand. Notice his left foot coming up to a fairly neutral stance as he hits the ball and then quickly releases his back foot for a “Brake Step” to stop his momentum. Comparing Brock's stroke to Novak’s I notice one large difference; Djokovic finishes with his hitting elbow very high, a fairly common aspect typical pro forehands. Brock’s stroke finishes with his elbow low and across his body, which I will talk about in a moment. Recommendations While Brock has a reasonably strong forehand, he could get set earlier and establish an open stance (when he is not forced to run out wide to hit), to create more torque that would help him accelerate the racquet through contact better. One other point that is more difficult to identify would be the height of Brock’s hitting elbow as I mentioned before. Most top players drive through and raise this hitting elbow higher to facilitate the brushing action of the topspin. A lower elbow tends to force a player to roll the racquet sooner, a point I made in the first set of comparisons. Even in Roddick’s comparison, his elbow rises high but it happens in a flash as he quickly relaxes the arm after the point, thus making it harder to identify. Using the pause button, you can see things that are usually harder to diagnose or catch when observed at regular speeds. Second Player I wanted to show a contrast for the two-handed backhand for one of our top girls. Allie Bergin is a 17 year old player, one of the top 15 girls in Utah, here hitting her two-handed backhand.
Again, in this clip, we see Allie hitting a fairly controlled stroke in a practice environment. Obviously, it would be even more revealing to compare her backhand in competition to see if there are any breakdowns occurring due to the pressure of live ball competition. Backswings of both Allie and Ana consist of a loop component. You might recognize the difference between their two loops, however: Allie starts back with a fairly straight backswing, a la Hewitt, raising up on her full extension and then creating a smaller, more compact loop (a la Agassi) just prior to contact. Ivanovic has a more conventional loop, taking her racquet back higher from the start and then dropping it into the “slot” prior to contact. I don’t believe one loop is significantly more advantageous, however, a teaching pro will want to look out for any wristy movements with either backswing. Both players use a fairly neutral stance, with Ana having to first move back to set up her footwork pattern. Allie puts more weight on her front foot through contact, but again this is due to the situational shot more than a particular difference that can be identified as “good” or “bad.” At contact, there are many similarities between the two; both players prevent their hips from opening up too early and have good extension of the non-dominant hitting arm. Ana finishes higher after contact where Allie, like Brock’s forehand, has a slightly lower, more horizontal, driving swing path. Allie has a very strong backhand, with a nice hold at her finish. This allows her to finish the stroke and create a reliable, repeatable swing pattern that gives her consistency and stability. Most pros have a clear ending of each stroke, however, this is not as apparent in the live-ball sequence we see with Ana.
As with all the previous clips, we are comparing Allie in a practice drill versus a pro hitting in a live match. Even so, we can identify many elements of a player’s stroke using this comparison tool. In Allie’s shot, she moves up on a slightly shorter ball, establishes a strong front foot, with a nice kick-back of her rear leg at contact. While Tatiana’s back leg kick-back is more subtle, it nonetheless is there. Both players stay quiet with their body through contact with Tatiana’s need to recover forcing her to return to a ready position much sooner than what Allie had to do. Allie’s finish of her racquet is nearly identical to Golovin’s where her non-dominant elbow is held high at the finish point. Conclusion Obviously, you can study all your shots with this technology. The hard part now is capturing your ‘true’ shots for comparison. Take a look at other comparisons that are already available by other members to get a feel for what you can do with this tool. Study your stroke pattern and see if there are inconsistencies, breakdowns, undesirable wrist or footwork movements, and other detrimental elements. Remember that hitting any groundstroke well is a lot like hitting a good serve: you need to have the ball in a good position when you strike it. On the serve, the toss dictates this criterion. On ground strokes, footwork is the source of consistent positioning. However, like any shot, if your stroke pattern is flawed, the best footwork in the world won’t save you! And, likewise, having a great stroke with poor footwork will result in similar inconsistencies. Use the TennisOne Video Network to learn more about your game. It will indeed speed up your learning and open your eyes along the way!
Your comments are welcome. Let us know what you think about Dave Smith's article by emailing us here at TennisOne .
|