|
TennisOne Lessons
Groundstroke Progressions Training an 8-Year Old—Part Four David W. Smith, Senior Editor TennisOne In this fourth segment I will describe the early progressions I have used over the past six months in training my daughter, Kyla's groundstroke game. Because of the depth and importance of this topic, I will divide this into two parts to be covered over the next two months: This month I will cover Initial Progressions and next month Drills and Skills.
In my previous articles, I discussed the Serve, the Volley, and the General Philosophy I use in training all my students. It should be noted here again, these patterns of development, what I call my “Advanced Foundation”, are the same foundation principles and practices I use in training any and all beginners. The idea of an Advanced Foundation is to teach tennis strokes, grips, and footwork patterns that don’t have to specifically change for players to reach not just their true tennis potential, but also give the individual the opportunity to play tennis at levels that may lead to more significant playing opportunities. These more accomplished opportunities can include everything from playing on a high school varsity team, reaching a junior ranking in a USTA or ITF division, playing college tennis, or reaching the ultimate level, playing professionally. In addition, those who learn tennis within this Advanced Foundation are usually more knowledgeable about the game—to the point that many of my students go on to become respected tennis instructors, coaches, and teaching professionals. Interestingly enough, I have already seen evidence of this with Kyla. On a number of occasions, she has had friends come out with her after school and Kyla readily takes on the role of instructor, providing her friends with competent and logical advice. Her understanding of the game, from the effect of spin on a ball to knowing how to create correct swing paths, is readily obvious in these teaching situations.
In addition, I should mention that Kyla’s tennis training didn’t just start in January of this year. We actually started two and three days per week (about 45 minutes a day) back in October of 2006. While she has been playing relatively more seriously for these last six months, I should mention that there were a few things related to helping Kyla with her groundstrokes that we did when she was younger. Now, let me also make a point here: We used this device no more than a total of 20 minutes over the course of a year; a couple minutes once a week was the maximum amount of time we practiced. I mention this for a couple reasons. First, I firmly believe that at this age, (or any age for a beginner), it is far more important to have kids develop the right swing pattern without hitting a ball to a target or over a net. This is because a player will invariably change any unfamiliar swing to meet their perception of how to get a ball to go somewhere. Watch any beginner tennis player on a tennis court and you will almost never see anything remotely close to prolific tennis strokes. Skilled tennis strokes are seldom natural or familiar to most people when first introduced to tennis, let alone a young child. Second, by spending only a few minutes any given day on developing the low-to-high topspin swing pattern, footwork, and balance, (as well as learning where the contact point for these shots should be), using the PracticeHit allowed me to program Kyla to develop her footwork, stroke, and her finish (a pattern I think you will notice when you watch Kyla hit most all of her groundstrokes). Also, I specifically did not push her too hard. I had her hit only enough practice swings so that she actually wanted to hit more when we stopped. This way, she usually looked forward to hitting the little foam ball instead of dreading it. Ten or twenty swings at a session was the usually routine; as I said, only a minute or two on any particular day and she had the swing pattern down pat in a very short period of time. While I usually start beginners with the volley and the serve, (as mentioned in the first of these articles), because Kyla was much younger when she started asking me about tennis, the progression for volleys and serves would have to wait another year or two. Thus, I did introduce her to this groundstroke pre-training a full year before we ever went to the court to hit real tennis balls. In my experience, working at a resort that insisted on teaching the loop swing for every student, I saw that not only was the mandated loop swing not necessarily the right loop for each student, but a large number of students forced to employ this mandatory loop, failed to learn to get their racquet head below the ball for a topspin stroke. From this very traditional framework, we were actually able to move towards open stance footwork patterns and very modern forehand and backhand stroke patterns quickly and successfully. One more thing, I teach many beginners and almost all youngsters both a two-handed forehand and a two-handed backhand and this was the starting point for Kyla’s groundstroke development. Two-handed Forehand
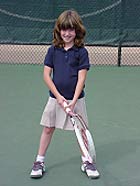
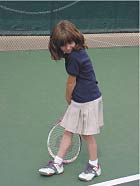
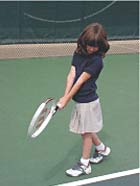
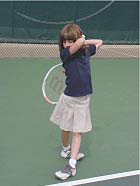
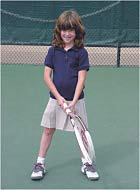
I prefer to keep the dominant hand on the bottom, (Monica Seles forehand, although, I was teaching this stroke a good five years before Monica appeared!). The swing pattern is very simple and compact. The hands drop to the right hip (right-handed descriptions here), and the racquet head is pointed down. The step into the ball is with the left foot and the swing mimics any modern forehand stroke with the dominant’s elbow finishing high. The non-dominant left elbow stays close to the body at contact and the player’s dominant arm follows through for the old, “Kiss the Bicep” finish. For more detailed information on the two-handed forehand, please refer to my articles in the TennisOne lesson library that describe this stroke in more detail. Two-handed Backhand
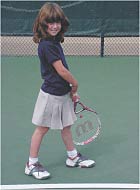
The model form I use for all beginners is basically the “Lleyton Hewitt” backhand. The grip is continental for the dominant hand, usually an eastern forehand for the non-dominant hand. The swing pattern is almost a mirrored image of the two-handed forehand as the hands drop down to the left hip, the racquet tip points downward, and the step is into the ball with a traditional closed or neutral stance. There are some key reference points that the player can relate to: The hands close to the hip on the backswing; at the contact point, the dominant arm’s elbow stays close to the player’s side, and the follow-through has the non-dominant’s elbow point to the target and the “kiss the bicep” phrase is applicable for knowing where the non-dominant’s arm should be at finish.
As a model, I like Lleyton Hewitt’s backhand as the foundation stroke pattern because he uses a very simplified swing pattern, one that is perfect for teaching beginners within my “Advanced Foundation” concept. Initial Training: Drop Feed It amazes me to hear pros talk about letting kids self-discover tennis strokes through specific live-ball hitting games and activities. As I mentioned, skilled tennis strokes are very seldom (if ever) natural or familiar, especially for kids! I have yet to see a kid develop prolific and effective strokes when left to limited instructional and drill programs. Yes, many kids will discover how to get a ball over the net. Yet, as most people know, there are an infinite number of ways a player can get a ball over the net. On the other hand, there are relatively few ways in which skilled players hit a ball over the net within the context of effective, consistent, and progressively improving stroke patterns. Observe the millions of adults who try desperately to change from their rudimentary and, oftentimes, elementary "dinking" and "hacking" swing patterns only to find that they simply can’t make the transition. In developing Kyla’s game, it was important for me to have her natural strokes be correct. And, like playing a piano, the way you make the unnatural become natural is to practice the desired pattern or skill to the point it becomes natural. Starting with a raw beginner, I believe, makes this a much easier accomplishment than trying to retrain someone who has ingrained patterns that are already established in competition. Thus, with Kyla, we spent her first couple of months using all drop-feed drills. However, my drills were far from those that are traditionally seen in beginner-type lessons. I did not want Kyla to think about hitting tennis balls in a straight-ahead mentality. That is, traditionally, beginners are taught to hit tennis balls straight ahead, over the net and pretty much down the middle of the court. At best, many pros might have a student hit crosscourt and/or down the line. But I took this concept to the extreme.
I started Kyla on the angle topspin forehand and backhand for several reasons: First, it opened her eyes and developed her ability to know how to hit significant crosscourt topspins. Second, hitting a sharp angle topspin makes the student figure out how to get the ball up and down quickly using spin. Third, using the severe angles helped her see how different the angles are when hitting a down the line compared to the sharp angle crosscourts. In addition, we worked on the geometric angles needed when hitting down the line from out wide, learning to hook a ball back into the court. Recently we have started to rally with excellent success. Kyla is hitting 10 to 15 topspins in a row with good consistency and footwork. This, obviously, is one of the main goals to playing tennis successfully. However, as I have mentioned many times, I do not want my players to sacrifice or compromise the form and techniques we have learned and worked on, just to get a ball over the net. The goal was to enable Kyla to successfully rally and compete after six months of training while maintaining proper form; form that will allow her to progress as she matures and hit more effective, consistent, and competitive strokes. Your comments are welcome. Let us know what you think about Dave Smith's article by emailing us here at TennisOne .
|


 Your comments are welcome. Let us know what you think about this article by