|
TennisOne Lessons
Jelena Dokic and the Millennium Forehand: by Heath Waters When studying the top players in the world it is important to understand that in almost every instance, you will find flaws in their technique. If you were to ask most current or former top athletes in any sport if they felt like their technique could be or could have been better, the answer is more often than not YES. The main reason is that everyone, including these top athletes, is constantly battling their own individual negative tendencies which keep them from executing optimal technique 100% of the time. Why is Tiger Woods the first on the practice range in the morning and the last one to leave? Why did Michael Jordan and Larry Bird always stay after practice to work on their jump shots or free throws? The answer is simple. Mastery of technique is a never-ending life long process of making constant daily adjustments. If the top athletes in their particular sport all had perfect technique then Tiger would never miss the green from 100 yards out, Sampras would not miss a second serve, Jordan a free throw, or Gretzky a slap shot from short range. However, the big difference in top athletes is that, while under pressure, they can reproduce optimal technique more often than their opponents.
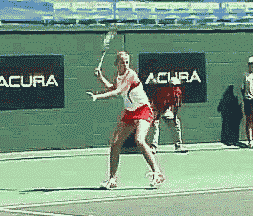
Today we are going to study and analyze Jelena Dokic's forehand, one of the top players on the women's tour. I will break her technique down into my 1, 2, 3 step system, show you the good, the bad, and the ugly and teach you how to apply what we learn to your own game. The main focus will be the open stance forehand and I will teach you what I call the millennium forehand ending, the forehand that is predominantly taking over the tour. As a coach on the professional tour, it is my job to keep players on the cutting edge of tennis and now it is your turn to learn what they know. So lets get started. Position Number One: PreparationEvery stroke should always begin with a split step, pivot, and simultaneous coiling of the torso while taking the racquet back into its final preparation position. As you coil and take the racquet back with your body, you will begin to load your weight onto your right foot until you are in the final preparation position. We will call this final preparation position "number one". There are four key reference points in "number one" the final preparation position. In Figure 1 I have illustrated these key reference positions with regard to Jelena Dokic.
The first reference point is the position of the left arm, which should end somewhere around shoulder height and parallel to the net in the final preparation position. Why is this done? Because players use the left arm as a reference point to initiate the coiling of the body while pushing the racquet with the left hand into "number one". This final left arm position mandates that the racquet was taken back with the body rather than just the arms. Whenever you reach across your body with the opposite arm, the shoulders and trunk will naturally have to rotate. Keeping the left hand on the racquet as you take the racquet back helps guarantee shoulder turn. But how long do you keep the left hand on the racquet before letting go? If you observe closely, you will see most of the top players let go of the racquet right in front of their chest as they are coiling the torso and taking the racquet back. Keeping the left hand on the racquet too long will inhibit your final preparation position. Achieving this final left arm position promotes maximum body coil, but just as important it promotes the uncoiling of the body because in order to strike the ball one must move the left arm out of the way to initiate the uncoiling of the body.
The second reference point to note is the loading of weight to the right leg. In figure2, Jelena has completely loaded her weight to the right leg just as she has reached her final preparation position. This is crucial for the set up of proper weight transfer, which will occur from the right side of the body to the left during stroke execution. The third reference point is the right hand position during "number one". Notice the square around the hand (figure 1). The important thing to observe is the height of the hand. As you can see by the square illustration, Dokic's right hand is around shoulder height. The reason for the high preparation is to utilize gravity to its advantage. The higher the racquet preparation the less energy the player will have to use to gain maximum racquet speed before striking the ball. Also more momentum will be gained due to the longer distance the racquet has to travel before making contact. To achieve this, the player takes the racquet back with the body and positions the hand shoulder height or higher in some instances but always in a relaxed state. One thing to note here is that the elbow should be slightly bent when taking the racquet back this high. If the arm is completely straight, the racquet has been taken back too high. This will put an enormous amount of stress on the shoulder and could eventually lead to injury.
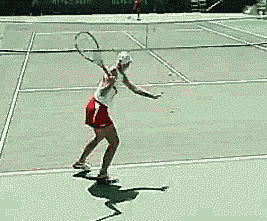
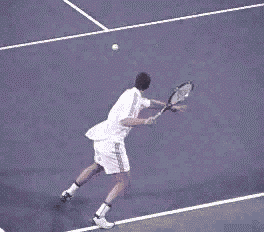
The fourth reference point is the position and direction of the racquet head. This is the first area that Jelena's technique could be more efficient. As you see (figure 2), her racquet head is pointing upward but behind her. For more efficiency the racquet head should point directly upward and in front of the flight path of the ball as illustrated by Henin-Hardenne and Safin (figures 3 and 4). Now it is time for you to practice getting into the "number one" position yourself. Get your racquet and without hitting a ball practice repetitively taking your racquet back into the final preparation position as demonstrated by Henin-Hardenne and Safin. Once you split step and take the racquet back see if you have met all the reference points.
Do this over and over to create muscle memory. Do it with your eyes closed then open your eyes to see if you have achieved the correct "number one" or final preparation position. Once you have mastered this, video tape yourself on court to see if you can achieve the "number one" position while hitting balls. Position Number Two: The Hitting Zone (Contact Point) The single most important characteristic about all stroke production is the contact point. From "number one" the final preparation position we go into "number two" the hitting zone (contact point).
The player begins to let gravity do it's thing by letting the racquet fall into the hitting zone using very little of his or her own energy. Gradually the player uses more and more of his or her own energy as the racquet approaches the contact point. To achieve maximum racquet speed use only as much energy as necessary to complete the motion within the technique. This will enable more racquet head speed and encourage proper form. In my opinion, this is partially what keeps Dokic from executing efficient technique all the time. She needs to consciously relax her arm and body more while striking the ball as well as keep her swing on a linear plane with the ball. The reference points for the contact point on the forehand are:
We will call the contact point position "number two". This is the key to consistency in all strokes. No matter how good, bad, or ugly one's backswing is, if you can meet the ball at the same contact point each and every time, you will develop a consistent stroke. Jim Furyk, this years US Open Golf champion is a great example of this. Many say that Furyk's golf backswing is extremely unorthodox, but one thing is for certain, if you look at his contact point and Tiger Woods contact point they are the same when they both hit their targets! In saying this, however, I believe there are definitely more efficient, consistent, and biomechanical sound ways of achieving this contact point than others. The goal is to be able to consistently reproduce this same exact contact point over and over again, which equals consistent strokes. This leads me to the explanation of Dokic's inefficiency in her backswing and hitting zone. As you can see from the side view camera angle (figure 5) she achieves a nice waist high contact point out in front of her left foot. But from a rear view camera angle (figure 6), inefficiency in her downswing into the hitting zone is exposed. Her racquet head is pointing behind her in the "number one" position. This causes her to swing on a circular plane rather than linear plane such as Safin, Federer, Henin-Hardenne, Roddick, Agassi etc.
Observe her racquet as it drops down into the hitting zone compared to Marat Safin (figure 7) and you will notice the racquet head goes behind her back rather than staying on a linear plane (linear plane means the racquet should stay in front of the flight path of the ball at all times-basically in front of your chest). Swinging on a circular plane decreases the length of the hitting zone. The racquet will be pointing at the target for a shorter amount of time before and after contact point. What all of this equates to is that Dokic has to be perfect in her timing on each and every ball for her to hit consistent forehands because she has less margin of error in her down swing and hitting zone than Federer, Safin, Henin-Hardenne, Agassi, Roddick etc. Dokic does make contact between waist and chest height as seen above but maybe not flush quite as often as she would like due to this lack of efficiency. To sum up position "number two," you will achieve maximum consistency and power if you contact the ball equidistant and equi-height off the ground each and every groundstroke. A good drill to practice this is to have someone feed you low and high balls while you focus on contacting the ball waist height out in front of the left foot each and every time (note: when low balls are fed, you must bend your knees to swing the racquet through at waist level). When you do not have to alter or improvise your swing or technique on either high or low balls, then you are on your way to mastering the proper contact point in position "number two".
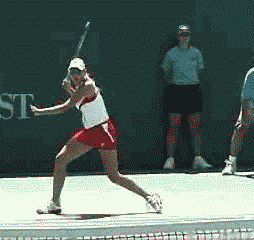
Position Number Three: The Ending We will refer to the stroke ending as position number three. Position number three is the secret to controlling all that racquet speed and power and still being able to keep the ball in play. I would like you to observe two things in position number three.
I call this part of the millennium forehand "closing the stroke off". This is the single most important advancement in the forehand technique over the last two decades. Sergio Brugera and Thomas Muster began the trend in the early 90's but player's of today have taken it a step further using this technique ending not only for heavy topspin, but using variations of this ending to hit moderate topspin and the "Big Bang" flat shot. The revolutionary improvement of this ending now enables players to control when and where the ball will come down into the court on the other side of the net. This means they now have a more simple way to control ball depth.
The sooner the player gets the racquet head to position number three or "closes the stroke off," the sooner the ball will dive into the court on the other side of the net. In essence what is occurring is that players are controlling the length of position number two (the hitting zone) by using this ending technique. In the classic style (ending with the racquet over the shoulder) the ending really has nothing to do with depth control. In the classic style all depth control is done in position number two (the hitting zone). This means a player must have great feel to know how long to keep the ball on the strings or (hit through the ball) in order to gauge the depth of each ball. But now with the millennium forehand technique, players can control the length of the hitting zone by the stroke ending rather than just relying on feel of the swing while stroking through the hitting zone. We less talented players now have a way to cheat and still catch the talented! For example, to hit a lob or deep shot into the court, simply extend the hitting zone by keeping the strings on the ball for a longer period of time and then "close the stroke off" into position number three. To hit an angle, a dipping shot at a net rusher's feet, or a shorter ball for any reason, shorten the hitting zone by keeping the strings on the ball for a very short amount of time and then "close off the stroke" into position number three even sooner. The difference here is that rather than focusing on position number two (the hitting zone) to gauge ball depth, a player using the millennium technique ending simply focuses on making adjustments to position number three by getting there either sooner or later to control depth. This evolution of technique is undoubtedly due to the search for a way to control the powerful racquets of today as well as the enormous racquet speed generated by the players who use them .
When a player hits a ball long with the classic over the shoulder ending, they will typically have to adjust by either slowing down their racquet speed, decreasing the amount of time the ball is on the strings ("hitting through the ball"), or by adding more spin. With the millennium technique ending, it is the opposite. Players using this forehand technique swing even faster and simply get to position number three sooner to correct their next ball from going long again or from going wide if they are hitting an angle. This in turn automatically takes care of decreasing the amount of time the ball is on the strings without having to think about it. Hmmm...I like that! The less I have to think the better. This ending might seem unconventional at first, but if you study the men's (and many of the women's) forehands of today closely you will be hard pressed to find many that are not predominantly using some form of this ending technique. The women's players on tour are moving into this direction but you will see several still predominantly using the classic over the shoulder technique. Dokic uses this ending part of the time but she needs to use her body, relax, and let her body naturally rotate through the shot as Henin-Hardenne and the male examples demonstrate. Often she uses just the arm. One thing to note, if you just flick the racquet into this ending and leave your elbow up and away from your body as Dokic has done (figure 8), it could lead to some serious shoulder and elbow injuries. So it is important to hit this shot with the body.
A good reference point to tell if you have executed this properly is to note whether the elbow ends right in front of the belly button with your right shoulder blade slightly facing the net. To practice this ending have your coach or someone feed you balls at waist height level and begin already set in position number one. From there start your swing through the hitting zone (contact point) swinging from low to high and then back down to position number three, ending with your forearm and racquet head pointing to the ground as in the above pictures. Think of it as swinging up and back down to this ending while flirting with how long to go up and how quickly to go down. This will determine your ball height and depth. Freeze in your "number three" and check your reference points. Once they resemble the images above, then you are off and running to mastering the millennium forehand. Take it Out on the Court So now you know the Good, the Bad, and the Ugly on Jelena Dokic's forehand. Take her good and put it in your game but leave the bad and ugly for someone else. You have the proper fundamental commonalities of some of the best forehands in tennis, put neatly into a 1, 2, 3 step system, one that can be easily understood and mimicked. Now it's up to you to put the three steps together. Get in front of a mirror and examine your preparation, contact point, and ending. When you feel you have copied the exact 1, 2, 3's of the millennium forehand, put the three steps together at the same time. Once you have that down, videotape yourself and compare your forehand to the pros, then refine your technique. Follow this course of action and pretty soon you'll have the millennium forehand mastered just like the top players in the world. |

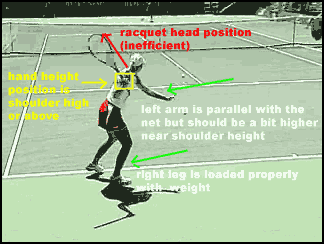
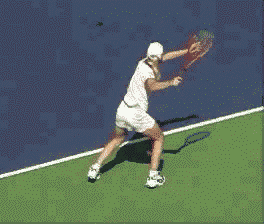
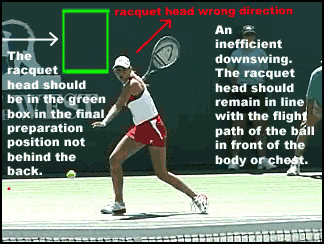 Figure 2: Dokic's inefficient racquet take back position leads to a circular swing through the hitting zone, rather than a linear swing.
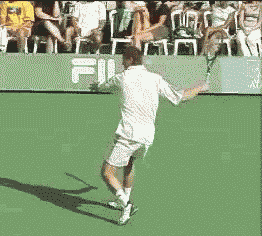
 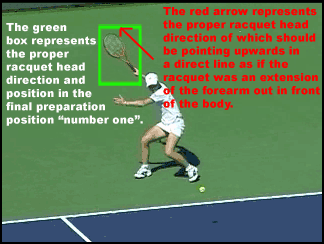 Figure 3: Henin-Hardenne demonstrates a great position "number one" keeping her racquet at all times in line with the flight path of the ball.
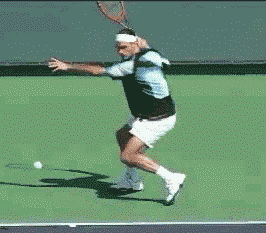
 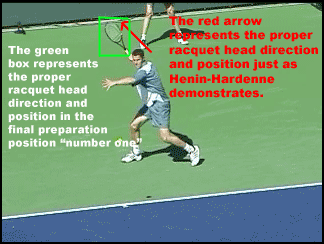 Figure 4: Safin demonstrates a great position "number one" in his final racquet preparation position just like Henin-Hardenne, keeping his racquet at all times on a direct linear plane with the flight path of the ball.