|
TennisOne Lessons
The One-Handed Beauty - I Want One! Heath Waters
Probably the most talked about and most coveted shot in all of tennis by players of all levels is the one-handed backhand. It seems if a player can hit a nice one-handed backhand then they are automatically considered to be talented. Let's name a few past and present one-handed backhand players and see if you think the word talented runs synonymous with the mentioning of their names: Roger Federer, Justine Henin-Hardenne, Amelie Mauresmo, Hachim Arazi, Henri Leconte, Yannick Noah, Tommy Haas, Pete Sampras, Conchita Martinez, Boris Becker, Michael Stich etc. I can bet you have heard the term talented, creative, and/or shot maker a few times when these players names have been kicked around in general tennis discussions. So why is this? Maybe it is the natural beauty and elegance inherent in the one-handed backhand. When struck properly, there is such a feeling of freedom and fluidity compared to that of the more restricted movement of the two-handed backhand. It is like comparing a swan to a duck. The swan is elegant, graceful, and majestic while the duck well it's is just a duck isn't it? Maybe the reason for this is that the one-hander is the most unnatural shot to hit in tennis, and for most, the hardest to learn. Therefore, most people think if you can hit one, well then you must be talented.
I personally think it is a combination of both of these reasons. The one-hander looks more appealing and it is a harder shot for most to learn, but I am not sure about the talent label. I think Borg, Agassi, Courier, Safin, Wilander, etc. are just as talented as many of the one-handers. I think these players could have been great in other sports as well if they had chosen to pursue them. I personally measure talent by all around athletic ability such as how well one runs, throws a ball and catches it, by their balance and agility, etc. These guys arguably had as much talent as the one-handers. I guess we will never truly know the level of athletic ability unless we had an all sport obstacle course or some type of speed, agility, balance, and physical hand-eye coordination test to compare one against the other. For now I suppose we only have our own individual opinions. Who is to say who is right and who is wrong? Not me. Nevertheless, I have a one handed backhand and fell in love with Edberg's and Becker's backhands when I was a kid. I guess I loved the freedom of swinging away at the ball the one-hander gave me and stuck with it. So if you feel a little inspiration to learn a one-hander yourself let's get to it. In this article we will show you some slight differences in one-handed backhands but predominantly we will focus on teaching you the fundamental commonalities that all great one-hander's posses. We will use The ACE System to break down some of the best technical backhands of today into three easy steps that you can quickly learn and apply to your own backhand. The Grip In this case study, we will observe Roger Federer, Justine Henin-Hardenne, and Tommy Robredo. Federer and Robredo use a classical full eastern backhand grip and Henin-Hardenne exaggerates her grip even more slightly towards the western side.
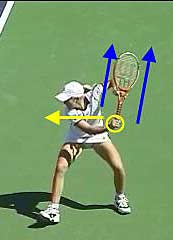
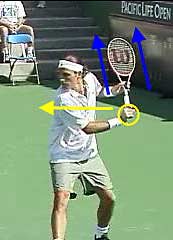
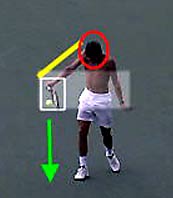
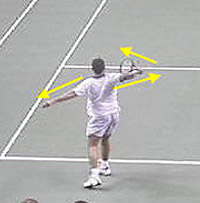
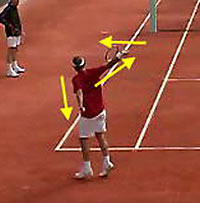
Step One - The Preparation Phase There are four specific reference points you should achieve in your final preparation position. I have illustrated these reference points in all three player's in the pictures above. First reference point: The shoulder turn. Notice all three players have coiled their upper torso and their right shoulder is turned at near 45 degrees to the net or slightly more than perpendicular to the net. This will guarantee the players will get full use of the kinetic chain once they begin there down swing. Second reference point: Tuck that right shoulder you have now coiled ever so neatly under your chin. Once again, observe the players above. This is a great cue for you to kinetically feel for when achieving your final preparation position. Tucking your shoulder under your chin will let you know if you are getting those shoulders turned properly. Third reference point: Observe the direction of the racquet in the final preparation position. Note that all three players' racquet heads are pointing upward toward the sky as demonstrated by the blue arrows above. This reference point happens to be the one where most students go wrong. At the club level, I see many players take their racquets straight back, pointing it towards the back fence or ground rather than up to the sky like these players demonstrate. Fourth reference point: The height of the right hand during the final preparation position. Notice that all three player's right hands are between chest and shoulder height, meaning all of these players are using a loop back swing. Robredo's right hand is at shoulder height while Federer's is at chest height and Henin-Hardenne's is between chest and shoulder height. Some one-hander's on tour place the right hand even higher than these three players during the final preparation position. Gustavo Kuerten, Richard Gasquet, and sometimes even Mark Phillouppousis, for example have their right hand just above shoulder level near ear height. I personally prefer and coach my students to place the right hand at shoulder height like Robredo, Haas, Guadio etc. Not too high and not too low Goldie Locks would agree.
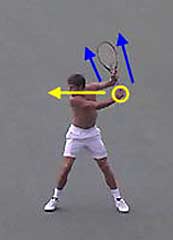
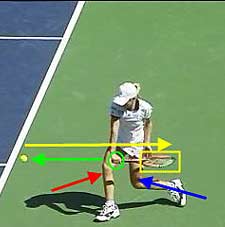
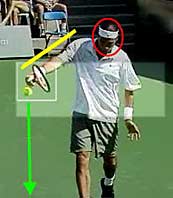
Placing the hand at shoulder height gives you the benefits of both the lower and higher preparations. One can still take the racquet back with the body (many students lose form more often when taking the racquet hand up as high as Kuerten and Gasquet - they tend to use the arm to take the racquet back rather than the body when they attempt this high preparation) and secondly, it makes it just a bit easier to get the same racquet speed without having to roll your wrist as much as Federer does from a lower preparation (I only think the very gifted can roll their wrist as much as Federer and still time the ball consistently well). Bottom line is that great one-handed backhands have high preparation with the right hand rather than straight back or down low take-backs as many club players attempt. The reason for this is quite simple. The high preparation allows players to generate more racquet speed while having to use less of their own energy. From a higher preparation such as this, the racquet gains more momentum naturally from gravity and because the racquet has a longer distance to travel before contact. The more racquet speed one can generate equals more power and more spin and more spin leads to more control. So stand up with your racquet, split step and turn into your final preparation position then see if your racquet and body positions meet all four-reference points listed above. If not, repeat your preparation over and over until you induce the muscles to memorize the final preparation position with your eyes closed. Step Two - The Hitting Zone and Contact Point There are four reference points in the hitting zone phase and five reference points in the contact phase. First reference point: Collapse your back leg as you begin the down swing (as represented by the blue arrows on the right). This will allow you to more easily get under the ball and is a major fundamental commonality in all-great one-handed backhands. Second reference point: Note the racquet head face and position (represented by the yellow box in the pictures on the right). The racquet head falls approximately one racquet head length below the ball as it drops into the hitting zone from the final preparation position. The more topspin one wants to create the more one should drop the racquet head below the contact point as this will increase the upward degree of swing upon the ball thereby generating the desired topspin. Also notice that all three players have their racquet face closed as it drops into the hitting zone (Please don't try to close the racquet face by turning your hand or wrist or anything else on the downswing. if you have the correct grip, the racquet face will close naturally as these players demonstrate.) Henin-hardenne's racquet face is closed more than Federer's and Robredo's due to her extreme western grip. Her racquet face is parallel to the ground where as the men's racquets are facing more towards the side fence). Federer's and Robredo's racquet face position is more common and the one I recommend for all level of players. Third reference point: Get the butt of the racquet to face the ball as it approaches contact. This is represented by the green circle and arrow in the diagrams. Fourth reference point: As you begin your down swing into the hitting zone, transfer your weight from your left leg to your right leg (represented by the red arrows in the diagrams. If you take care of collapsing the back leg as noted in reference point number one, then this will occur naturally. Contact Point I can not stress too much that the most important part of all technique to master is the proper contact point. Even if you do not master any of the other reference points in this article make sure you master these, as this is the key to consistency in all strokes. There are five reference points that one should achieve at the exact moment of impact with the ball.
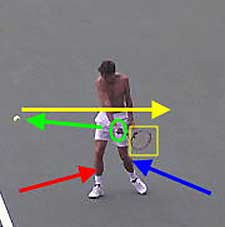
First reference point: The location of the exact contact point in relation to the body. Your goal here should be to make contact at the exact same point off the ground and the same distance from your body each and every time you strike a ball. I call this, "making contact equi-height off the ground and equi-distant from the body." This of course depends greatly on your footwork, as you will need to position yourself to the ball exactly the same way for each ball you want to hit with the one-handed backhand. The highlighted areas in the photos above represent the hitting zone in which you should always, and I mean always, make contact with the ball. So to clarify, you should make contact between waist and chest height at all times, but preferably waist height as this is the height at which you will get the most power and natural depth. Second reference point: Think six inches. That is the exact distance from the body that you should make contact with the ball each and every time. Observe the pictures above and you will see that all three players make contact approximately six inches in front of their right foot. When studying all great technical backhands you will see this same distance in front of the right foot at contact point over and over again. Third reference point: The position of the right arm at contact. Notice all three players' arms are completely straight at contact. This is a fundamental commonality among all great one-handed backhanders. Many amateurs make the mistake of bending the right arm at or before contact when trying to add topspin to the one-handed backhand.This leads to a lack of control, depth, and power. Kinetically, feel for your right arm straightening at contact. This is a great cue for you to focus on when striking the ball and one thing that will quickly improve your one-hander.
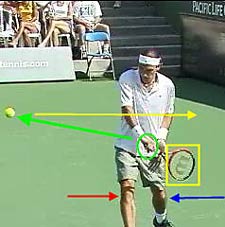
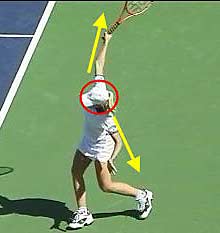
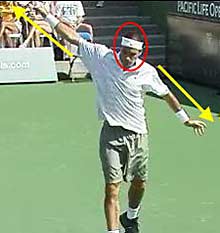
Fourth reference point: Close the face at contact. Note that Federer's racquet face is more closed than the other two. This is because the ball he is striking is a higher bouncing ball and his contact point is slightly above waist height rather than the optimal waist height. Federer compensates for this higher bouncing ball by closing the racquet face a bit more, in that way he can impart more topspin to the high ball. So to clarify, the racquet face should be slightly closed or basically facing the net at contact as seen in the above diagrams represented by the white boxes. Fifth reference point: The head should remain completely still with the eyes on the ball all the way through contact (represented by the red circles above). This is a must to master for all levels of players. No matter what kind of technique you have, achieving these fundamental commonalities during contact are essential elements to hitting a consistent one-handed backhand. So next time on court, when practicing, make sure to strike the ball at waist height off the ground, six inches out in front of your right foot, with your right arm straight, and the racquet face closed. And keep your head still at contact! Follow these rules and you will improve your consistency within minutes. Step Three - The Ending The ending is quite simple but important. There are only four reference points to achieve when finishing the one-handed backhand stroke. First reference point: The position of the upper torso. Your goal should be to stay side ways or as close to 90 degrees as you can to the net all the way through the follow through before you unturn and get ready for the next shot. As you can see Federer (right) is more sideways than the other two players throughout his stroke ending. Robredo and Hennin-hardenne open up about 45 degrees to the net. Forty-five degrees is the most one should open their shoulders on the follow through as any more than this and one will lose directional control of the ball and lose length of their hitting zones which leads to less depth and less target control. Second reference point: The head should remain completely still all the way through the ending just as at the contact point. Third reference point: The left arm should extend backwards during the follow through. All three players above demonstrate the left arm going back from contact all the way through the ending but Robredo is the best example of this as his left arm is fully extended straight behind him while the other two have their arms slightly bent. By throwing your left arm back right at contact and extending it completely behind you during the ending of the stroke you will be able to keep your body more balanced. The left arm acts as kind of an anchor or parachute for all the racquet speed generated and will help keep your body balanced and sideways to the net so your racquet stays on a linear flight path towards your target. The left arm also helps propel the right arm forward as well. Try it you will love the results.
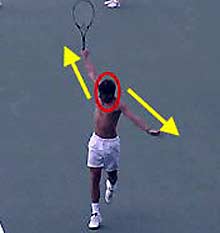
Fourth reference point: Continue the extension of the right arm all the way through the ending. Notice that the right arms of all three players are completely straight well into their ending. A common error for many one-handers is the bending the right arm or elbow during the finish or ending of the stroke. Keep it straight just as the players here demonstrate. A good visual to think about is to try to touch your shoulder blades together or to visualize the safe sign in baseball when ending the stroke. Variation Ending As a quick note: I am throwing in a variation ending demonstrated here by Federer and Phillippousis. The main difference is that the racquet head is pointing to the back fence instead of towards the sky as seen in most conventional endings.
This ending is used primarily on crosscourt shots and is simply a natural progression to the rolling of the wrist. Do note that the right arm, however, is still straight while the wrist has broken. Don't bend the elbow while breaking the wrist on this ending. I only recommend trying this ending if you are an advanced player or after you have mastered the conventional ending with the racquet head pointing toward the sky. Although no two strokes are the same as you can see from these three players. Hennin-hardenne uses a more western backhand grip than the other two, Federer rolls his wrist much more than the other two, Federer stays sideways more than the other two on his ending, and Robredo comes up with the legs on his ending more than the other two and so on and so on. With The ACE System we do study the dissimilarities of players technique, but to learn and master great technique we have found that it is not what players don't do but rather what they DO do that leads to success therefore we instead focus on the biomechanical fundamental commonalities of what makes all these backhands great. We pinpoint, define and breakdown the stroke to its purest and most simple form. The specific racquet and body positions that all of these players achieve while executing their one-handed backhands is what we as students must learn and master. We don't want to reinvent the wheel. We just want to figure out how it was made and see if we can make it better.
So there you have it. I have broken down one of the hardest shots in tennis into an easy to understand 1, 2, 3 step system consisting of specific fundamentally common reference points for you to achieve and mimic in each step. Now it is up to you to stand up, pick up your racquet, and practice achieving each of these steps and the reference points that go with them. First practice without a ball in order to create muscle memory. Then, after you think you have the reference points down, take it onto the court and tape yourself hitting a ball. See if you are meeting the reference points as outlined above. Once you master these you will have a beauty of a one-hander just like the pros! Your comments are welcome. Let us know what you think about Heath Waters' article by emailing us here at TennisOne.
This invaluable visual comparison, combined with the detailed analysis by a current tour professional coach, offers the most advanced and unique learning environment in tennis. Pro Tech will store your video lessons for two years on your own web page, so you and your coach can evaluate your progress from anywhere in the world. TennisOne members receive a 10% discount.
|