|
TennisOne Lessons
The Slice Backhand Hit under spin with a Grin Heath Waters
The slice backhand is it the most overrated or underrated shot in tennis; the most overused or underused? Well, it is my position that the slice backhand is the most underrated and underused shot in tennis today. The great news is that, thanks to Roger Federer, the use of the slice backhand is making a comeback in a big way and Federer is showing the world all the valuable benefits of using this too often dismissed asset. In today's game of pure unadulterated power, it is a breath of fresh air to watch Federer as he transports us back in time to a place when players actually had to build and develop points using a variety of pace, spin, and location. He is the Bobby Fischer of tennis and a delightful shot in the arm from the past. One might say Federer is Old School millennium style. If you ever get the chance to watch him in person, take the opportunity, as he will rouse your imagination with his artistry and shot-making prowess like no one since John McEnroe's artistry and ingenuity dominated the net. The difference is that Federer's artistry flows from every part of the court and is not limited to just creative net play. My hope is that he will inspire you to more creativity on court as he has me, both as a player and a coach. Today, along with a few other players, we are going to examine one particular part of Federer's game that resides in his vast repertoire of chess openings the slice backhand.
There have been many a great slicer's in the day and many players in the past used their slice backhands in their own special way. Graf used her slice to set up her huge forehand, Rosewall made his slice the foundation of his game, Edberg and Rafter used their slice predominantly to get into the net. Wilander incorporated the slice backhand mid way through his career to neutralize his opponents power and change the rhythm of the points. This, he claims, added a whole new dimension to his game and led him to three Grand Slam victories in a single year. In my opinion, however, no player in history has utilized the slice backhand more completely and more effectively than current number one, Roger Federer. Roger has the uncanny ability to block chip Andy Roddick,s 150 mph serves at his feet on the grass. He can hit the running lunge slice better than any player I ever saw and that gets him out of seemingly impossible situations time and time again. He can chip the softest of short angle shots to draw players into the net in order to rifle blistering passing shots by them on the very next ball. Roger uses the floating slice return down the middle to frustrate the big power hitters, he chips and charges the net at will putting constant pressure on opponents, he drives his slice crosscourt and down the line equally well, and most importantly Federer can rocket a topspin one-handed backhand down the line or rip an angle right past his opponent and that makes his slice backhand all the more effective. It's kind of like being without a boat stranded in the middle of the ocean floating around in the deep murky waters and you just cut your finger before you fell into the water. You know the sharks are coming you just don't know when or where, and how many are going to circle beneath your feet ready to chomp away at your legs as if they were tasty treats from Kentucky Fried Chicken. The anxiety alone could kill you.
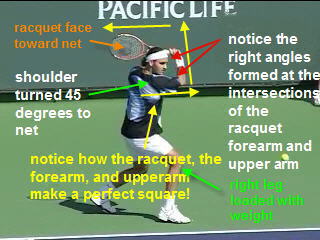
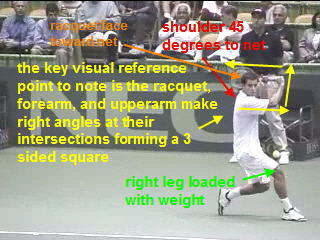
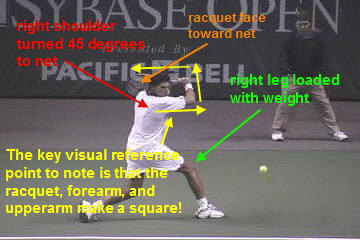
It is not that Federer's technique is superior to all the greats of the past. It is the completeness in which he utilizes his slice backhand that sets him apart from all others. He can punish and confuse his opponents in so many ways. So the next time you are watching Federer play a match, take note of how and when he uses his slice. Observe not only his immaculate and effortless technique, but also note the many variations of under spin, targets, and initiatives he employs. The ACE System Now let's get to the good stuff. We will now use The ACE System to break down the slice backhand technique into three easy to learn steps consisting of the specific biomechanical reference points that all the best slice backhands achieve throughout the execution of the preparation, hitting zone, and ending phases of the stroke. The first thing to note before we get going is the grip. The continental grip should be used for the slice backhand. Number One: The Preparation The first reference point and the most important to master is the position of the racquet, forearm, and upper arm during the final preparation position. I call this the Square position. When you observe all three players in the illustrations you will notice during the final preparation position, the racquet, forearm, and upper arm form the Square shape or right angles at their intersections illustrated by the yellow arrows.
This is the single most important position in the preparation phase. The upper arm should hang naturally and be parallel to the ground, the forearm should be about 45 degrees to the ground, and the racquet should be pointing over the left shoulder to the side fence behind you as you see all three players demonstrate. Once you master this reference point position the rest is easy. Practice over and over in the mirror without hitting a ball and look for the square position until you have it down cold. The second reference point is the position of the racquet face in the final preparation phase. Notice that the racquet face along with the backside of the palm are pointing towards the net. A common mistake at all levels is to point the racquet face up towards the sky in the final preparation position. This can often lead to a fluff or floating slice because when starting from this position the racquet face tends to open too much at contact leaving inefficient string surface area to make contact with the ball. Positioning the racquet with the face pointing towards the net will make it easier to carve the backhand in a C like swing action.
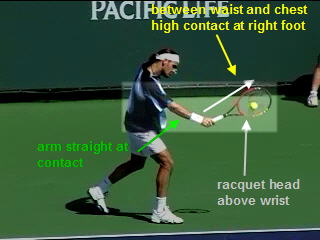
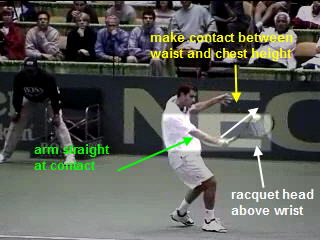
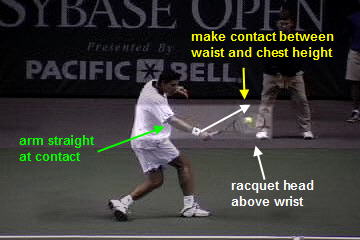
These specific reference points are fundamental commonalities in all technically sound slice backhands demonstrated by Federer, Sampras, and Philippoussis in the pictures above. The third reference point during the final preparation position is the position of the upper torso. Notice that the racquet has been taken back with the body, and specifically the shoulders turned 45 degrees to the net. It is a common mistake among all levels of players to use the arm to take the racquet back. I occasionally even see professional players on tour and high-level juniors wrapping their arms around their necks on the racquet take back. The proper take back is to set the racquet into the square position right after the split step and then coil the upper torso to take the racquet back utilizing the body. A good way to practice this is to simply stand up get yourself into ready position with your racquet already in the square position, but still facing the net, then split step and pivot and let the body take the racquet back into the final preparation position. Coil the upper body until your right shoulder is 45 degrees to the net or to the computer if you were facing the computer while attempting this form. The fourth reference point - the loading of the right leg. As demonstrated in the pictures, you should load all of your weight onto your right leg simultaneously as you achieve your final preparation position. This movement is very similar to a lunge and will actually be a full lunge if one is stretched out of their comfort zone. Just make sure when you step with the right foot to try and step at a 45 degree angle towards the net or towards the left net post for a visual reference to ensure proper weight transfer and better balance. Number Two: The Hitting Zone The first reference point to achieve during the hitting zone phase is the formation of the racquet and wrist at contact.
Notice that the racquet head in all three illustrations is above the wrist at contact. The wrist is cocked back like the hammer of a gun into position number one or the square position and as the wrist releases the racquet head will approach contact still above the wrist. The racquet head will not catch up with the wrist or become even with the wrist until after contact. This is a great visual for you to reference and you should kinetically try to feel for this reference point as you strike the ball (until it becomes habit). I suggest videotaping to review this one, as it will be hard to see with the naked eye. The second reference point - the position of the right arm on the downswing through the hitting zone. The arm should be almost straight at contact. The key word here is almost. The elbow does not actually lock out completely until just after contact as you can see in the Federer animation below. Notice that complete extension of the right arm does not occur until one frame after contact. Some players, such as Justine Henin-Hardenne, straighten out or extend their right arm too soon during the downswing. When the right arm is extended or straightened to early this disjoints the natural release, fluidity, and flow of the kinetic chain into contact because the link between the upper arm and forearm becomes one unit rather than two distinct links in the chain.
As you can see with Federer, the elbow acts as a hinge between the upper arm and forearm. Federer straightens out his arm just after contact whereas Henin-Hardenne straightens her arm and locks out the elbow at the beginning of the downswing. Sampras, Federer and Philippoussis will be able to generate more kinetic energy with their technique as well as reduce stress on the shoulder when swinging through the hitting zone. Stand up and try both techniques. First swing with the arm straight at the top of the downswing like Justine Henin-Hardenne. Next, try swinging with your arm slightly bent from the square position during the downswing. Hold this slight bend in the elbow until just before contact and then straighten the arm out like the three men. With this method, if performed correctly, you should feel less stress on the shoulder. See also if you can feel the difference in fluidity and freedom of swing that having the arm bent longer through the hitting zone gives you. If you would like to correlate the feeling to something similar, it is kind of like throwing a frisbee.
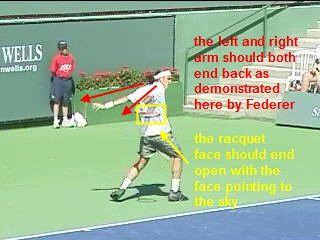
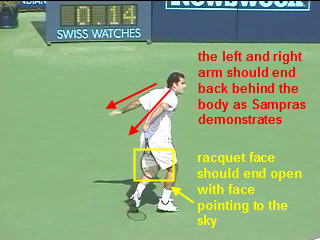
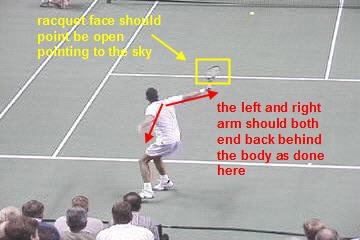
When throwing a frisbee you coil your body, bend your arm, and then extend and release to throw. This is a very similar feeling to hitting a proper slice backhand. As you can see Hennin-Hardenne does not achieve the square position in her preparation. This is where her inefficiencies begin. When looking at Henin-Hardenne's slice backhand in regular speed you might think it looks like a nice slice backhand and many a commentator just might state the same, but when we use The ACE System to break it down with high speed video frame by frame, then all the small inefficient nuances are exposed. The third reference point during the hitting zone is the contact point. By now if you have read any of my past technical articles you will know now that, of course, the contact point is always the key to consistency in all strokes no matter how bad your technique is. If you make contact with the ball at the same height off the ground at the same distance away from your body each and every time you strike it, then you will ultimately have a consistent stroke whether it is ugly or not. The optimal contact point is represented by the highlighted area in the pictures. It should always be between waist and chest height and out in front of the body at the right foot as demonstrated by all players in the above illustrations. Number Three: The Ending The ending for the slice backhand is very simple. I will give you only two reference points to focus upon that are fundamental commonalities in all great slice backhands. The first reference point is the formation of the left and right arm during the final ending position of the stroke. Notice that the left and right arms of Federer and Sampras are completely behind the back and close to it in Philippoussis' case.
The key here, is at contact, you should throw the left arm back as the right arm continues its forward progression through the shot. The left arm acts as a catalyst and will actually help increase the racquet heads force and throw the racquet through the ball with more ease. While one is ripping through the ball with all this racquet speed, the left arm also acts as an anchor point for the body. When the racquet is going so fast through the hitting zone the left arm helps keep the body sideways or closed a fraction longer and also provides more balance and stability. Better balance will allow for faster recovery after the shot is completed. A nice analogy you might be able to relate to is that the ending should look like the Safe-Sign in baseball. What helps me is to think of trying to touch my shoulder blades together after contact. Let's look at Henin-Hardenne's ending and observe some problem areas that some of us might experience at times.
As you will see in these particular clips, she does not utilize her left arm efficiently. She does not throw her left arm back like the other players do. This causes a lack of balance through the ending of her shot. In the clip on the left, her head is over her toes, she is bent at the waist, and she appears to lack balance.
In the second clip, she opens up very quickly with her chest almost immediately facing the net after contact. This tends to decrease the length of the hitting zone. By opening up so rapidly after contact she will lose directional control of the ball and so will we if we imitate this technique. So my suggestion would be to not mimic Henin-Hardenne's slice backhand ending but rather focus on throwing back that left arm while the right arm goes forward to the ending. This will give you greater power, balance, and directional control of the ball as demonstrated by the more efficient technique of Sampras, Federer, and Philippoussis. The second reference point during the ending phase of the slice backhand goes hand in hand with reference point number one. When you finish, the part of the racquet face that you made contact with the ball should be pointing to the sky along with the backside of your left palm. Another way of stating this is to say the opposite which I relate better to. Simply end with both palms facing the ground. If you have the continental grip then the racquet face will be facing the correct direction. This is a simple visual reference point that all great slice backhands utilize during the ending phase of the stroke.
So there you have it. Using The ACE Progressive System, I have neatly broken down the fundamental commonalities of some of the great technical slice backhands into an easy to learn 1, 2, 3 step system consisting of visual reference points for you to mimic during the preparation, hitting zone, and ending phases of the stroke. The easiest way to learn this technique is to focus on achieving the preparation position, swing through the ball and then freeze in your ending and see if you ended with your palms down trying to touch your shoulder blades together. Don't forget to get to the square position in the preparation. Now, practice these reference points and let me know how it goes! Your comments are welcome. Let us know what you think about Heath Water's article by emailing us here at TennisOne.
This invaluable visual comparison, combined with the detailed analysis by a current tour professional coach, offers the most advanced and unique learning environment in tennis. Pro Tech will store your video lessons for two years on your own web page, so you and your coach can evaluate your progress from anywhere in the world. TennisOne members receive a 10% discount. |