<% ns_puts [mkm_getnavbar] %>

The Visual Tennis Alternative,
The Role of the Hitting Arm Position: Forehand
By John Yandell
Go to Part
1 Part 2 Part
3 of the Visual Tennis Series on TennisONE
Of the thousands of words coaches and teaching pros have
used to describe tennis strokes in lessons, articles, videos, etc., no single
element is more neglected and misunderstood that the role and position of
the hitting arm. In fact, even the term "hitting arm" is largely
unfamiliar in the vast lexicon of tennis tips.
Although it is widely agreed that the face of the racquet must be at a precise angle at contact with a tolerance of only a few degrees for any stroke to be bio-mechanically consistent, the most important factor in achieving proper contact--the role of the hitting arm--is rarely described.
The Hitting Arm Position: Forehand
|
Think about it! The hand and the arm are directly responsible for positioning the racquet at the most critical moment in the swing --the contact point. But in the world of tennis tips, a world plagued by constant information overload, the hitting arm position isn't even a major topic.
The few common "tips" that relate to arm position are either vague--"keep the contact in front" or just plain incorrect "keep a firm wrist."
Have you as a player ever paid attention to the exact position of your hand, wrist, forearm, elbow, and upper arm?
In the Visual Tennis system, the position of the hitting arm is a central aspect of all stroke models, particularly the groundstrokes and the volleys. In the remainder of this series I want to outline how to create and utilize superior hitting arm positions for all the strokes, starting first with the forehand.
Turn on television coverage of any major event and sooner or later you'll here a commentator say something like: "And with a flick of the wrist he hits another amazing forehand winner!"
Don't believe it! It's not true! The wrist position for virtually every good forehand in tennis, as we will see, is actually laid back, with a corresponding elbow position--a hitting arm position that stays constant throughout the swing.
I have done video analysis of dozens of top forehands, including two of the greatest in the history of the the pro game, Ivan Lendl and Pete Sampras. At contact their wrists are laid back, with the elbow bent in what I call the visual tennis double bend hitting arm position. Both players establish this wrist and arm position at the time the racquet starts forward to the ball, then maintain it over the course of the foreswing, up to and including the finish position of the stroke.
This hitting arm position is extremely simple to create and maintain. Although a simple straight backswing is by far the cleanest way to achieve the correct hitting arm position, the shape of the backswing itself is less important than delivering the hitting arm to this position before it starts forward to the ball. You can do it with a circular loop like Steffi Graf, or a closed face loop like Sampras and Lendl. But do yourself a favor--try the straight backswing first. If you master the hitting arm position at the turn as described below, you will naturally develop a compact, rhythmic eliptical shaped loop.
The key images below and the animation teach you how to achieve this double bend hitting arm position for yourself, how to set it up at the completion of the preparation, and maintain it over the course of the swing.
For each position, establish the checkpoints physically. Now close your eyes and create an internal mental image of the position. Execute the entire swing pattern with your eyes closed. Let your internal imagery of the checkpoints guide the motion. The images of the hitting arm at each of the positions in the model can now function as keys to executing the stroke on the court. As the ball leaves your opponent's racquet, visualize the image of the hitting arm position at the completion of the turn. Project the image into space behind you and let this serve as a mental blueprint. Now cover the blueprint with your actual arm and racquet.
Now shift to the image of the contact and/or the finish. Again the projected image serves as a blueprint. Let your arm and racquet pass through the image as you swing. Start in a controlled drill situation with an easy feed from a partner, teaching pro or ball machine, and work up to more difficult balls. The images give you a way to execute the stroke and stay positive under pressure.
The process of visualizing a key image can occur in the flash of a second--the time we actually have to hit a tennis ball. Using these images will give you an extremely reliable way to produce this classic hitting arm position even under competitive pressure. For players who have struggled with late contact, a "wristy" stroke, or short and constricted follow-through, the image of the hitting arm is a magic solution that will let you produce powerful, consistent forehands and do so effortlessly and with a physical pleasure you may not have thought possible.
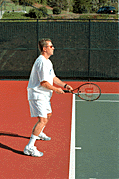
A good balanced ready position allows you to make a simple straight backswing when you turn and immediately establish the hitting arm position. Note the head of the racquet points straight ahead with the shaft of the racquet parallel to the court and at about waist level.
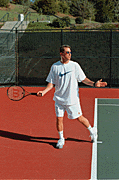
This is the hitting arm position at the completion of the preparation or turn. Note the key checkpoints: The elbow is relaxed and tucked in toward the side, almost touching the body. The wrist is laid back so that the tip of the racquet is pointing to the back fence. The butt of the racquet is "taking a picture" of the opponent.
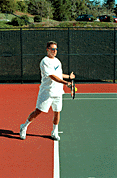
The palm of the hand and the right shoulder have pushed the racquet forward to the contact point with the hitting arm position unchanged--elbow in and wrist back. Note the contact well in front of the body--the laid back wrist is the key. High speed video shows this position is the same for any bio-mechanically sound forehand.
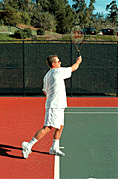
At the completion of the stroke, the wrist reaches eye level and remains laid back. The plane of the racquet is now perpendicular with the left shoulder and the shaft of the racquet is straight up and down. Note, also the unchanged elbow bend. The forearm is about 45 degrees to the court. The upper arm is parallel to the cour (see the animation below). Replicating these three positions using your internal mental images just might give you the same kind of depth, power and confidence of the top players who follow this model so beautifully!
Send email to the author
We encourage you to email your comments (pro, con, appreciative, whatever) directly to the author. To send email to John Yandell, click here.
To see John Yandell's Pro Tennis video series, go to: http://www.protennisvideo.com/index.html
Go to Part 1 Part 2 Part 3 of the Visual Tennis Series on TennisONE
Last Updated 9/1/98. To contact us, please email to: webmaster@tennisone.com
TennisONE is a registered trademark of TennisONE and SportsWeb ONE; Copyright 1995. All rights reserved.

