<% ns_puts [mkm_getnavbar] %>


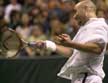
Andre Agassi
Part1: Technical
Photographs by J.Gregory Swendsen
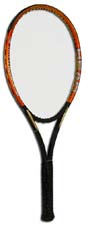
Head Intelligence i.Radical
|
Many experts consider Andre Agassi to be the best pure ball striker on the ATP tour. He is also the only active man to have won all four slam events - a total of seven overall. This alone would ensure him a place among the greatest players of all time.
In part 1 of this two part pictorial, J.Gregory Swendsen's camera focuses on the technical side of Andre Agassi. Stay tuned for part 2, his emotional portrait.
Take a close look at the nearly flawless game of this great champion.
Click on thumbnails to view photos.
 Unit Turn |
 Unit Turn 2 |
 Perfect Turn |
 Perfect Turn 2 |
 Forehand Foreswing |
 Ball Focus |
 Square at Contact |
 Perfect Wrist Position |
 Hitting Through |
 Hitting Through 2 |
 Full Wrap |
 Unit Turn |
 Unit Turn 2 |
 Perfectly Lined Up |
 Left Arm, Right Arm |
 Hitting Through |
 Hitting Through 2 |
 Perfect Extension |
 Backhand Balance |
 Backhand Balance 2 |
 Backhand Balance 3 |
 Backhand Wrap |
 Ready Serve |
 The Arm Drop |
 Shoulder Rotation |
 Start of Weight Shift |
 Tossing Arm |
 Full Coil |
 Full Coil 2 |
 Racquet Drop |
 Air Andre |
 Air Andre 2 |
 Serve Follow-through |
 Kick Back |
 A Rare Volley |
 A Rare Volley 2 |
 A Rare Volley 3 |
 A Rare Volley 4 |
 Overhead |
 Return Focus |
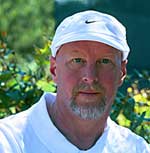 J.
Gregory Swendsen, 49, is a San Francisco investment banker who travels the
world for TennisONE as chief contributing photographer. A native San
Franciscan, Greg has raised private venture capital for the last 20 years,
primarily in the bio-tech and pharmaceuticals industries.
J.
Gregory Swendsen, 49, is a San Francisco investment banker who travels the
world for TennisONE as chief contributing photographer. A native San
Franciscan, Greg has raised private venture capital for the last 20 years,
primarily in the bio-tech and pharmaceuticals industries.
In addition to his careers in finance and digital photography, Greg is a
recording jazz guitarist who plays regularly on the San Francisco jazz
scene. He is a competitive tournament player and has been ranked in USTA
Northern California in the 45 and over men's singles division.
To contact us, please email to: webmaster@tennisone.com
TennisONE is a registered trademark of TennisONE and SportsWeb ONE; Copyright 1995. All rights reserved.