|
TennisOne Lessons


The Alexander Technique and the Magic Move:
The Key to Ripping Groundstrokes
By Gary Adelman
 Observe Kim's superb coordination as she performs the magic move. Her entire body is coordinated and working as one integrated whole.
 |
The prior articles of this series have explained how the Alexander Technique, a time-tested method for natural and effortless movement of the body, can be used to improve various phases of your game. This article will discuss what I call "the magic move" for groundstrokes. The magic move focuses on the first part of the preparation phase of the stroke and it is "magic" because, if done correctly, it literally propels the remaining parts of the stroke into a higher level.
The magic move can be your ticket to hitting big-time groundstrokes. It sets up a player's balance, coordination, and timing for the rest of the stroke. It also loads up and stores energy in the body so the forward swing can be used to produce enormous racquet head speed.
The core elements of the magic move are derived from analyzing, using the principles of the Alexander Technique, not only the great groundstrokes of today's top players but also some of the great strokes of past champions.
Because of its importance and the fact that few players outside the pro level perform it well, this entire article is devoted to the mechanics of the magic move. All of the key components are covered. You may find the article somewhat detached but stick with me. I want to give you all the information you need to perform the magic move correctly.
 Note how Kim begins her magic move as soon as she starts to move for the ball. Her upper body coils around a bit more than her hips.
 |
As there are a number of facets to performing the move well, I strongly suggest first practicing the move in front of a mirror before trying it on the court. Start with the first element described and eventually add each of the other elements.
After you have become comfortable with the various pieces, try the move on the court. Frst have a friend feed you balls. Once you get the feel of hitting the ball using the move, you can then try it in a rally and eventually in a game.
The Magic Move
Now, let's learn the magic move. For ease of reference, this article will teach the magic move for a right-handed forehand groundstroke. But the basic ingredients described apply equally to the backhand groundstroke.
As the player sees the ball come off his opponent's racquet, he will take a split step. When he lands after the split step, he will move in the direction of the ball and at the same moment begin the magic move. We all know this involves a turning or coiling of the body to the right in this preparation phase of the stroke. But exactly how this is done is critical and is what the magic move is all about.
 Watch an infant crawl - the head leads and the rest of the body follows and elongates naturally.
 |
Initiate the magic move (which at its completion will put your shoulders at about a 45 degree angle to the net) with a release of the head from the neck in a slight forward and upward direction. As we learned in the prior article, "Movement and the Alexander Technique", leading with the head and following the lead of the head by a lengthening response throughout the rest of the body is the way that efficient, easy movement is supposed to be organized in the human body. All animals with a spine (like humans, cats, dogs, etc.) tend to move this way.
Just watch an infant creep or crawl--the head leads and the rest of the body follows and elongates. If, in contrast, a player makes the common error of starting the body coil with the shoulders or feet leading the move, the body will tend to shorten rather than lengthen. This will disturb the coordination of the whole body. It will cause timing errors and frequently produce mishits on the edge of the racquet.
As the player spirals or coils to the right, the right foot will turn out a bit. This slight turning out of the right foot allows the entire body to turn to the right. The right knee will be slightly bent and the left leg will turn inwards a little.
 Pay attention to the fullness of the back with the weight well balanced over the feet while the whole torso lengthens and widens.
 |
Four critical elements to the coiling
- The shoulders and upper torso should turn more than the hips .This differential creates a stretch (dynamic tension) that loads up the body like stretching a rubber band. This potential energy can then be unleashed in the forward swing.
- Although eventually your weight will shift over to your right foot at the end of the preparation phase of the stroke, keep your weight centered over both feet as long as possible. Placing your weight prematurely on your right foot will disturb your balance and prevent you from making an easy turn.
- Most critical of all, your weight must not shift backwards (towards the back fence) as you coil. You should feel that the weight is centered on the balls of your feet, not the heels.
The concept of keeping a balanced turn without shifting backwards holds true for many other sports as well, particularly those where a quick release is needed. Think of a boxer delivering a punch to his opponent. If he did not remain balanced directly over the balls of his feet but shifted backwards, he would become vulnerable to a counterpunch because he would not be able to deliver his own punch rapidly enough. Similarly, a quarterback throwing a pass, although he may move backwards will never take his weight back onto his heels. If he did, he would not be able to release the football quickly and would risk being tackled.
|
|
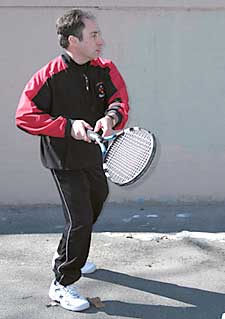
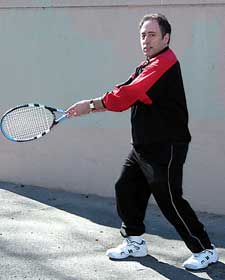
Photo indicates poor body use. The wieght is shifting backwards, thus disturbing the balance and would adversely affect timing. |
A line drawn straight down thru the right hip would pass thru the ball of the right foot. |
The best way to tell if your weight is properly balanced is, as you coil around in the backswing, to examine where your right hip is in relation to your right foot. In other words, a line going down thru your right hip should pass thru the ball of your foot. If that line is even a little behind the ball of the right foot, it means you have taken your weight back and lost your balance. It also means the stretch created between your upper torso and hips will be lost.
- Your head should remain balanced freely over your spine. Unfortunately, players often stick their necks out towards the ball in a misguided attempt to see the ball better. This throws off the body's balance. Another common error is to thrust the head sideways or backwards, again impairing the body's balance. If your balance is disturbed, it will distort your vision and prevent you from seeing the ball well.
Arms, Hands and Racquet
Let's now turn our attention to the proper role of the arms, hands and racquet in the magic move. Here are the important points:
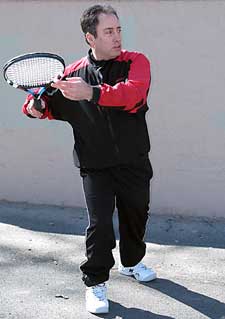
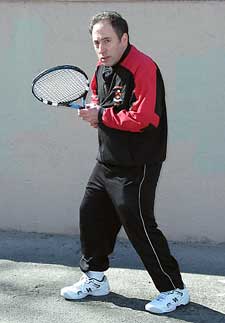 Gross body misuse. The arms are pulling in towards the body instead of lengthening out from the shoulders. The head is pulled forward of the spine and down into the neck. There is a downwards collapse thru the entire body with a lack of tone and absence of vitality.
 |
- The body turns and takes the arms and racquet with it. Avoid the mistake of taking your arm and racquet back without a body turn.
- As you coil to the right, both arms should lengthen out of the shoulders and be positioned comfortably away from the body. A common error when you coil is to keep the arms too close and cramped against the body. Players often do this as they believe that by doing so they will gain more control over the racquet head.In fact, they have less control because this tightens the arms with resulting loss of sensitivity in their hands.This in turn prevents them from knowing how the racquet face is slanted.
- As you turn, keep the left arm on the racquet.This guarantees you will coil the upper body the proper amount. Also, be sure not to take the racquet back behind your right shoulder. If you take the racquet back too far this will disturb your timing and prevent you from moving to the ball on balance.
- As you coil, the racquet face should naturally be allowed to close.This closing of the racquet will keep your arm in its most relaxed position.Do not try to lay the wrist back.If you lay the wrist back at this point it may cause tension in the wrist, elbow, forearm, and entire right side of the body.As you coil your right elbow should naturally slide back a little.This is not a move that you make happen but you simply allow to happen.This natural sliding action is responsible for what some teaching pros call "leading with the elbow."
- As you coil do not tighten the grip by clutching the racquet.This is a common flaw and is a sure way to destroy all the freedom in your arms and swing.
There you have it, all of the key components of the magic move. Now it is up to you to practice them. You will be rewarded many times over if you do.
The author gratefully acknowledges the help of Ed Weiss in the preparation of this article.
Your comments are welcome. Let us know what you think about Gary Adelman's article by emailing us here at TennisOne.
 Gary Adelman, a former top player at Columbia University, has been teaching tennis for 25 years and the Alexander Technique for 10 years. Gary is a certified Alexander Technique teacher, having completed a 3-year teacher training program for the Alexander Technique in Cambridge, MA. He has worked with national and world-ranked players with this technique at the Israeli Tennis Center in Ramat Hasharon, Israel, including Anna Pistolesi. Gary Adelman, a former top player at Columbia University, has been teaching tennis for 25 years and the Alexander Technique for 10 years. Gary is a certified Alexander Technique teacher, having completed a 3-year teacher training program for the Alexander Technique in Cambridge, MA. He has worked with national and world-ranked players with this technique at the Israeli Tennis Center in Ramat Hasharon, Israel, including Anna Pistolesi.
Gary has taught the Alexander Technique at Harvard University and Babson College and as assistant varsity women's tennis coach at Princeton University. Gary can be reached by email at GaryAdelman@verizon.net and by phone at (413) 442-5905.
|
|