
Private Lessons: The Serve - part 2
by Scott Murphy
|

Creating the “calm before the storm” increasing your chance of
having a consistent serving rhythm. |
In Part 1 of this series, I started my analysis of the
common issues I see working everyday with players at all levels. Part 2
continues the analysis beginning with the critical but little understood
concept of rhythm.
A player who takes the time to create what I call a “calm
before the storm,” has a much better chance of consistently hitting a
rhythmical serve. To this end, everything you do prior to launching
yourself to the point of contact should be done smoothly and calmly.
I see too many players start their service motions like they’ve got a
train to catch! Typically, players who rush at the outset have
inconsistent tosses and wind up either muscling the ball or dinking it.
It seems that servers who begin their motions with their hands above
shoulder level are more often the ones who tend to “rev up” at the wrong
time and create a “storm before the calm.” In other words, the higher you
start the greater the potential for a faster motion that will destroy your
rhythm. But however your motion begins, you need to stay relaxed,
learn to store your energy, and then let the “storm” happen when it
should, in the launching phase.
|
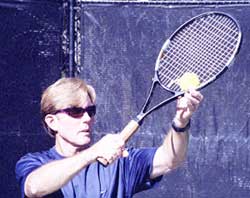
Starting with the hands too high is a likely cause of a rushed
motion. |
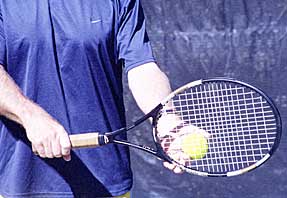
This is a good, low ready position, with the racquet supported with
the tossing hand. |
The first point in overcoming the tendency to rush is to use a ritual
before serving.
Align and set your feet, position yourself sideways to the
net and bounce the ball a few times. Support the racquet with the tossing
hand in the ready position to keep the hitting arm relaxed.
Now decide exactly what serve you are going to hit and where. Don’t serve
without a purpose! Without taking a long stare to give away your intent,
draw a line in your mind’s eye to the area you’d like the ball to land,
take a deep breath and calmly begin your serve.
|
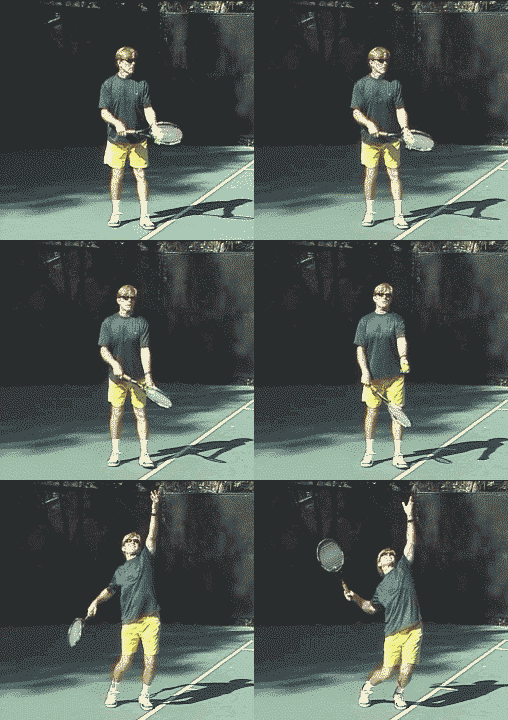
The knees flex down as the
hands go up. |
The Knee Bend
One of the most common problems I see with servers is the improper knee
bend. Players will bend their knees at the wrong time, over bend them, or
not bend them at all. Proper knee bend keeps the serve rhythmical and
provides an effective launch to the ball. For someone who doesn’t know
better, it’s very instinctive to bend the knees at the same time you drop
your hands to begin the service motion.
This, however, is incorrect because it will invariably lead to
straightening the legs too early, before the swing is ever made. This
disrupts rhythm and eliminates any launch. It’s not necessarily the depth
of the knee bend—that varies with the individual. It’s the timing.
|
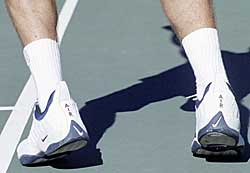
Lifting your heels increases knee bend and eliminates excessive
movement. |
My recommendation is to remain basically upright as you begin to serve.
Keep extra curricular movement at a minimum!
There’s a simple formula to time the knee bend. Flex the knees down as the
hands are going up. The knee bend should be fullest just after you release
the toss.
Initially, this can be like patting your head while rubbing your stomach,
but with concerted practice both on and away from the court, it will soon
solidify.
Experiment to find out how much you can drop your weight naturally in the
bending phase. Relax, let your weight fall, and don’t force the bend
because you saw how far down Pete Sampras can go.
This will maximize how much energy you store. This energy in turn will
then release naturally as you swing up to the ball. This is the launching
phase which is critical to generating power.
|
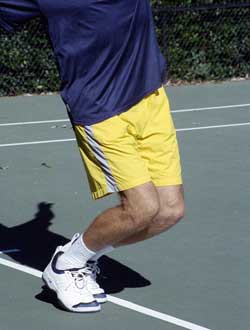
The pinpoint stance can lead
not only to foot faults, but also the
loss of power from the legs
and body rotation. |
Another way to enhance the knee bend is to simultaneously lift your heels.
You can bend your knees with your feet flat but you won’t do it
consistently, because it’s simply not comfortable. In addition, with the
heels up you truly “lock down” your feet eliminating any excessive
movement.
Not only will excessive movement create the potential for being off
balance but it can lead to a real bone of contention with me, and that is
foot faulting. I know a lot of players figure it’s not a big deal, but the
simple fact is that it’s cheating. It’s particularly disconcerting when
the player doing the foot faulting is a serve and volleyer, because it
gives the unfair advantage of getting to the net faster.
I think the players most susceptible to foot faulting are
those using the “pinpoint” stance. This is where the back foot is drawn up
towards the front foot before launching. Sometimes that back foot will
touch or cross the baseline just as the knee flex occurs. We even see this
at the pro level.
In any event, starting with a foot on the baseline or
touching the baseline or the court in front of it before striking the ball
is against the rules! I’m not sure you gain anything from this stance. In
fact, you may actually lose leverage from the legs, and also, run the risk
of rotating through the motion too soon. In my teaching I strive to
eliminate this extra step.
|
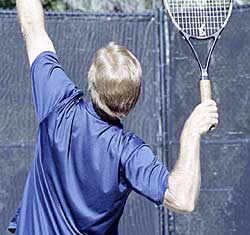
Note the tilt in the shoulder position, about 45 degrees to the
court. |
If you add the knee bend to what I wrote about cocking the
arm and racquet in part 1 of this lesson, the so called “trophy position” is complete. Note
the angle of the shoulders. Tilting the shoulders is important because it
allows for a better stretch of the body and encourages swinging up.
Imagine swinging upward to the ceiling rather than forward to the wall.
Swinging to the wall is, in essence, like pitching a ball, where the
shoulders remain on a level plane and the arm is bent at the release
point. When serving, the throw of the racquet is based on a tilted
shoulder position with the elbow driven up as the arm goes to full
extension.
These differences and images are very important to note. If the timing of
the knee bend is correct and the player swings to the “ceiling,” all your
stored energy will be released and the launch will just happen.
The Weight Transfer
|
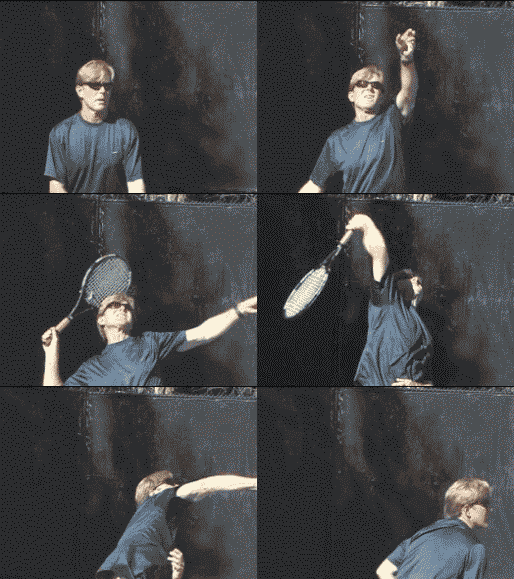
The motion of the racquet should be upward toward the “ceiling,”
not forward toward the “wall.” |
Lastly, some thoughts about weight transfer. I see too many people not
transfer their weight at all, and in some cases actually go backwards, in
large part because they don’t set up the lower body correctly or they toss
too far back to get any forward momentum.
There are essentially two kinds of weight transfers: thrust and crossover.
Thrust footwork is what you currently see all the pros doing. Once you
flex those knees they will need to extend and depending on the extent of
the knee bend this can result in something from a mild to a sizeable jump.
Immediately after the ball is struck the front foot lands
in front of the baseline, the back leg kicks back and then quickly comes
forward to stabilize and or propel you forward.
It’s important to note that the jump is purely incidental
and results from the upward thrust of the legs pushing off the ground.
|
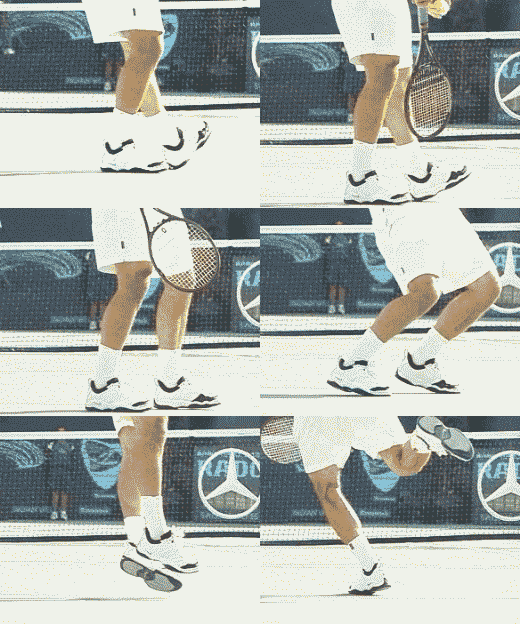
Pete Sampras demonstrates the thrust, landing on the front foot
with the back foot kicking back. |
When using the more traditional crossover footwork, the front foot remains
stationary during and after striking the ball and then the back leg swings
around into the court. Be sure, however, to not hit off of a flat front
foot.
I recommend this traditional footwork for the novice server, as it’s
simpler. But as soon as the other elements in the motion are solid, every
player should begin to develop the thrust. It’s one of the few things that
every player can really learn to do like the top pros.
That concludes the second part on the serve. But one final note. If you
don’t love to serve you should work on it until you do!
Developing a sound
service motion improves your athleticism and can give you the confidence
to take charge of a match. It’s well worth the effort!

|
Want more of Scott Murphy's creative prospective? Become a member and check out
some of his
other original articles in the TennisONE Lesson Library:
|
|
|
|
|