Theories of the Game
![]()

Go to Part 1 Part 2 Part 3 Part 4 Part 5 Part 6 Part 7 of the Visual Tennis Series on TennisONE
(Click here to see animation of forehand volley)
In this series, we are examining the role of the hitting arm position in stroke production. The mountains of tennis analysis, tips and advice rarely, if ever, discuss the position of the hitting arm and the hand during the course of a stroke pattern. But this position is critical to good technique since it determines how the racket head actually contacts the ball.
Previously, we have looked at the hitting arm position in the classical groundstroke patterns. But this key element of correct hitting arm position is equally important in hitting the volleys. In this and upcoming articles, we will teach you how to establish classical hitting arm positions at the net, beginning with the forehand volley.
In the Visual Tennis system, the volleys, like the groundstrokes, these simple hitting arm positions are set at the completion of the turn or preparation. They then remain unchanged throughout the course of the stroke pattern. Besides their simplicity, these positions are highly efficient, leading to consistency and natural power at the net.
In this article we begin by examining the hitting arm position in the classical forehand volley. The progression shown here demonstrates how to hit a basic flat volley. A subsequent article will show how to alter the hitting arm position slightly to create natural underspin or slice.
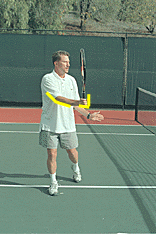
This position remains unchanged at the contact through the finish. The palm of the hand pushes the racket head through the motion. The elbow stays bent and the wrist stays laid back. As on the groundstrokes the player who masters these key positions will naturally and automatically add a small eliptical loop to change the direction of the racket. But there is no need to key this or incorporate it into the core elements of the model.
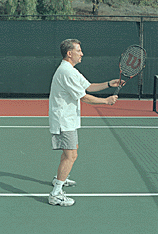
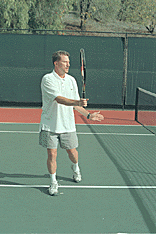
Below the forehand volley and the corresponding hitting arm position are broken down into 4 key positions with specific checkpoints. The key images teach you how to achieve this double bend hitting arm position for yourself, how to set it up at the completion of the preparation, and maintain it over the course of the swing.
For each position, establish the checkpoints physically. Now close your eyes and create an internal mental image of how the position looks inside your mind's eye and especially how it feels. Execute the entire swing pattern with your eyes closed. Let your internal imagery and feeling for the checkpoints guide the motion. If possible practice in front of a mirror and compare the motion to the checkpoints until you can execute it naturally and automatically. Now the image and feeling of the hitting arm can function as keys to executing the stroke on the court. Start in a controlled drill situation with an easy feed from a partner, teaching pro or, if possible, a ball machine, and work up to more difficult balls. The images give you a way to execute the stroke and stay positive under pressure.
The process of visualizing a key image can occur in the flash of a second--the time we actually have to hit a tennis ball. Experiment with the images for the turn and the contact. As your opponent begins his foreswing, visualize the image of the key and let the motion of your body follow the image. Using these images will give you an extremely reliable way to produce this classic hitting arm position for the forehand volley even under competiive pressure.
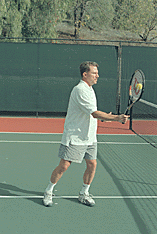
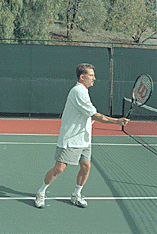
Finish Position: The forehand volley finish is extremely compact. The palm of the hand and the shoulder have continued to push the racket so that it travels slightly past the contact point, with the butt of the racket just past the edge of the left front leg. Note the unchanged position of the hitting arm with the elbow still bent and the wrist laid back. Watch in the animation how the body rotates into position and through the stroke maintaining this simple, powerful arm position.
See animation of forehand volley
- End of Part Eight -
Send email to the author
We encourage you to email your comments (pro, con, appreciative, whatever) directly to the author. To send email to John Yandell, click here.
To see John Yandell's Pro Tennis video series, go to: http://www.protennisvideo.com
Back To TennisONE Home Page
What's New | Tennis
Lessons | Tennis in Your
Area | Tennis Fitness
Tennis Products | Other
Tennis Sites | Sponsors/Advertisers/Consultants
|
Advertising
TennisONE© is a trademark of TennisONE© and SportsWeb ONE©.
Copyright© 1995. All rights reserved.